Run Redis in Docker: Complete Setup Guide 2026
Redis is one of the most widely used in-memory data stores in modern application stacks — and Docker is one of the fastest ways to get it running without cluttering your host system with dependencies. Whether you need Redis as a cache, a session store, a message broker, or a real-time leaderboard, running it in Docker gives you a clean, portable, and reproducible environment.
This guide covers everything you need to know: from pulling the Redis image and running your first container, to production-ready setups with Docker Compose, persistent volumes, password authentication, and inter-container networking.
Why Run Redis in Docker?
Before diving into the commands, here is why Docker is a solid choice for Redis deployments:
- Isolation — Redis runs in its own container with no conflicts with other system packages
- Portability — the same configuration works identically on your laptop, staging, and production
- Version management — switch between Redis versions with a single image tag change
- Easy cleanup — remove Redis and all its data with a single
docker rmcommand - Composability — connect Redis to your app container with Docker networking, no host-level configuration needed
Prerequisites
Before starting, make sure you have the following installed on your system:
# Verify Docker is installed and running
docker --version
# Expected: Docker version 26.x.x or later

docker compose version
# Expected: Docker Compose version v2.x.x or later

# Verify Docker daemon is running
sudo systemctl status docker
If Docker is not yet installed, follow the official installation guide at docs.docker.com.
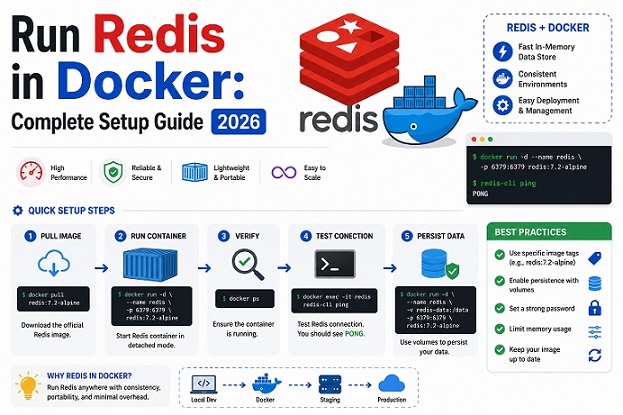
1. Pull the Redis Docker Image
Always use the official Redis image from Docker Hub. Pin to a specific version rather than using latest to ensure consistency across environments.
# Pull a specific Redis version (recommended)
docker pull redis:7.2-alpine

# Verify the image was downloaded
docker images | grep redis
Why Alpine? The redis:7.2-alpine image is based on Alpine Linux and weighs in at around 30MB — significantly smaller than the full Debian-based image (~130MB). Smaller images mean faster pulls, less disk usage, and a smaller attack surface.
Available Redis image variants:
| Redis Image Tag | Base Operating System | Approximate Size | Recommended Usage |
|---|---|---|---|
redis:7.2-alpine | Alpine Linux | ~30 MB | Recommended for production environments due to its small footprint and reduced attack surface. |
redis:7.2 | Debian | ~130 MB | Suitable when additional operating system utilities and packages are required. |
redis:7.2-bookworm | Debian 12 (Bookworm) | ~140 MB | Ideal for environments standardized on Debian 12. |
redis:latest | Debian | ~130 MB | Best used for development and testing; avoid in production because the tag may change unexpectedly. |
2. Run a Basic Redis Container
The quickest way to get Redis running is a single docker run command:
# Run Redis in detached mode
docker run -d \
  --name redis-server \
  -p 6379:6379 \
  redis:7.2-alpine

# Verify the container is running
docker ps | grep redis-server
Test the connection using redis-cli inside the container:
docker exec -it redis-server redis-cli ping
# Expected output: PONG
Run a few basic Redis commands to confirm it works:
docker exec -it redis-server redis-cli

# Inside redis-cli:
127.0.0.1:6379> SET greeting "Hello from Docker"
OK
127.0.0.1:6379> GET greeting
"Hello from Docker"
127.0.0.1:6379> EXPIRE greeting 60
(integer) 1
127.0.0.1:6379> TTL greeting
(integer) 58
127.0.0.1:6379> exit
3. Run Redis with Persistent Storage
By default, Redis data is stored inside the container. When the container is removed, all data is lost. For any use case beyond quick testing, you must mount a volume to persist data.
# Create a local directory for Redis data
mkdir -p ~/redis-data

# Run Redis with a bind mount
docker run -d \
  --name redis-server \
  -p 6379:6379 \
  -v ~/redis-data:/data \
  redis:7.2-alpine \
  redis-server --appendonly yes
What --appendonly yes does: This enables the AOF (Append Only File) persistence mode in Redis. Every write operation is logged to disk, meaning data survives container restarts and crashes.
Verify persistence is working:
# Set a value
docker exec -it redis-server redis-cli SET persistent_key "this survives restarts"

# Stop and remove the container
docker stop redis-server && docker rm redis-server

# Start a new container pointing to the same data directory
docker run -d \
  --name redis-server \
  -p 6379:6379 \
  -v ~/redis-data:/data \
  redis:7.2-alpine \
  redis-server --appendonly yes

# Verify the data is still there
docker exec -it redis-server redis-cli GET persistent_key
# Expected output: "this survives restarts"
Use a named Docker volume instead of a bind mount (recommended for production):
# Create a named volume
docker volume create redis-data

# Run Redis using the named volume
docker run -d \
  --name redis-server \
  -p 6379:6379 \
  -v redis-data:/data \
  redis:7.2-alpine \
  redis-server --appendonly yes
Named volumes are managed by Docker and are easier to back up, migrate, and inspect than bind mounts.
4. Run Redis with Password Authentication
Running Redis without a password is acceptable in local development, but is a serious security risk in any networked or production environment. Always set a password.
# Run Redis with password authentication
docker run -d \
  --name redis-server \
  -p 6379:6379 \
  -v redis-data:/data \
  redis:7.2-alpine \
  redis-server --appendonly yes --requirepass "YourStrongPassword123!"
Connect with authentication:
# Method 1: Pass password inline
docker exec -it redis-server redis-cli -a "YourStrongPassword123!" ping
# Expected: PONG

# Method 2: Authenticate after connecting
docker exec -it redis-server redis-cli
127.0.0.1:6379> AUTH YourStrongPassword123!
OK
127.0.0.1:6379> ping
PONG
Security tip: Never hardcode passwords in shell scripts or docker run commands that get saved to shell history. Use Docker Secrets or environment variables managed by a secrets manager in production.
5. Run Redis with a Custom Configuration File
For production deployments, managing Redis through a configuration file gives you far more control than passing flags to redis-server on the command line.
Create a custom redis.conf file:
mkdir -p ~/redis-config
nano ~/redis-config/redis.conf
# redis.conf — production-ready configuration
# Network
bind 0.0.0.0
port 6379
protected-mode yes
# Authentication
requirepass YourStrongPassword123!
# Persistence
appendonly yes
appendfsync everysec
save 900 1
save 300 10
save 60 10000
# Memory management
maxmemory 256mb
maxmemory-policy allkeys-lru
# Logging
loglevel notice
logfile ""
# Performance
tcp-keepalive 300
timeout 0
databases 16Run Redis with the custom config:
docker run -d \
  --name redis-server \
  -p 6379:6379 \
  -v ~/redis-config/redis.conf:/usr/local/etc/redis/redis.conf \
  -v redis-data:/data \
  redis:7.2-alpine \
  redis-server /usr/local/etc/redis/redis.conf
Key configuration parameters explained:
| Parameter | Value | Purpose |
maxmemory | 256 mb | Caps Redis memory usage to prevent OOM |
maxmemory-policy | allkeys-lru | Evicts least-recently-used keys when memory is full |
appendfsync | everysec | Balances durability and performance |
save | 900 1 | RDB snapshot if at least 1 key changed in 15 minutes |
protected-mode | yes | Blocks access if no password and not bound to localhost |
6. Run Redis with Docker Compose
For real-world applications where Redis runs alongside a web app, an API server, or a database, Docker Compose is the right tool. It defines the entire stack in a single file and handles networking automatically.
Complete docker-compose.yml with Redis, a web app, and proper networking:
version: "3.9"

services:
  redis:
    image: redis:7.2-alpine
    container_name: redis-server
    restart: unless-stopped
    ports:
      - "6379:6379"
    volumes:
      - redis-data:/data
      - ./redis-config/redis.conf:/usr/local/etc/redis/redis.conf:ro
    command: redis-server /usr/local/etc/redis/redis.conf
    networks:
      - app-network
    healthcheck:
      test: ["CMD", "redis-cli", "-a", "YourStrongPassword123!", "ping"]
      interval: 10s
      timeout: 5s
      retries: 5
    deploy:
      resources:
        limits:
          memory: 512M
          cpus: "0.5"

  webapp:
    image: myapp:latest
    container_name: webapp
    restart: unless-stopped
    ports:
      - "8080:8080"
    environment:
      REDIS_HOST: redis
      REDIS_PORT: 6379
      REDIS_PASSWORD: YourStrongPassword123!
    depends_on:
      redis:
        condition: service_healthy
    networks:
      - app-network

networks:
  app-network:
    driver: bridge

volumes:
  redis-data:
    driver: local
Start the stack:
# Start all services
docker compose up -d

# Check all containers are running
docker compose ps

# View Redis logs
docker compose logs redis

# Stop the stack
docker compose down

# Stop and remove volumes (WARNING: deletes all Redis data)
docker compose down -v
Why depends_on with condition: service_healthy? This ensures the web app only starts after Redis has passed its health check — preventing connection errors during startup when Redis takes a few seconds to be ready.
7. Connect to Redis from Another Container
When Redis and your application run on the same Docker network, your app connects to Redis using the container name as the hostname — not localhost or an IP address.
# Example: connect from another container on the same network
docker exec -it webapp redis-cli \
  -h redis \
  -p 6379 \
  -a "YourStrongPassword123!" \
  ping
# Expected: PONG
Example connection strings for common frameworks:
# Python (redis-py)
import redis
r = redis.Redis(host='redis', port=6379, password='YourStrongPassword123!', decode_responses=True)
r.set('key', 'value')

# Node.js (ioredis)
const Redis = require('ioredis');
const redis = new Redis({ host: 'redis', port: 6379, password: 'YourStrongPassword123!' });

# Go (go-redis)
rdb := redis.NewClient(&redis.Options{
    Addr:     "redis:6379",
    Password: "YourStrongPassword123!",
})
The hostname redis in each example matches the service name defined in docker-compose.yml.
8. Monitor Redis in Docker
Check real-time Redis stats:
# Monitor all commands in real time
docker exec -it redis-server redis-cli -a "YourStrongPassword123!" monitor

# View Redis server info and stats
docker exec -it redis-server redis-cli -a "YourStrongPassword123!" info

# Check memory usage
docker exec -it redis-server redis-cli -a "YourStrongPassword123!" info memory

# Check connected clients
docker exec -it redis-server redis-cli -a "YourStrongPassword123!" info clients

# View real-time stats (refreshes every 1 second)
docker exec -it redis-server redis-cli -a "YourStrongPassword123!" --stat
Monitor container resource usage:
# Live CPU, memory, and network stats for Redis container
docker stats redis-server

# Example output:
# CONTAINER       CPU %   MEM USAGE / LIMIT   MEM %   NET I/O
# redis-server    0.12%   8.5MiB / 512MiB     1.7%    1.2kB / 800B
9. Troubleshooting Common Issues
Issue 1: NOAUTH Authentication required
# Error when connecting without password
(error) NOAUTH Authentication required

# Fix: always pass the password
docker exec -it redis-server redis-cli -a "YourStrongPassword123!" ping
Issue 2: Connection refused on port 6379
# Check if the container is running
docker ps | grep redis

# Check if the port is correctly mapped
docker port redis-server

# Check Redis logs for startup errors
docker logs redis-server
Issue 3: Redis data not persisting after container restart
# Verify the volume is mounted
docker inspect redis-server | grep -A 10 Mounts

# Verify AOF is enabled
docker exec -it redis-server redis-cli -a "YourStrongPassword123!" config get appendonly
# Expected: appendonly → yes
Issue 4: OOM command not allowed — out of memory
# Check current memory usage
docker exec -it redis-server redis-cli -a "YourStrongPassword123!" info memory | grep used_memory_human

# Check maxmemory setting
docker exec -it redis-server redis-cli -a "YourStrongPassword123!" config get maxmemory

# Update maxmemory without restarting
docker exec -it redis-server redis-cli -a "YourStrongPassword123!" config set maxmemory 512mb
Issue 5: Slow Redis performance in Docker
# Run the Redis latency test
docker exec -it redis-server redis-cli -a "YourStrongPassword123!" --latency

# Run the full diagnostic
docker exec -it redis-server redis-cli -a "YourStrongPassword123!" --latency-history

# Check for slow queries
docker exec -it redis-server redis-cli -a "YourStrongPassword123!" slowlog get 10
Quick Reference Checklist
Use this before deploying Redis in Docker to production:
[ ] Using a pinned image version (not latest)
[ ] Named volume configured for data persistence
[ ] AOF persistence enabled (--appendonly yes)
[ ] Password authentication set (--requirepass)
[ ] Custom redis.conf with maxmemory limit
[ ] Redis on an isolated Docker network
[ ] Port 6379 NOT exposed publicly (use expose: not ports: in Compose)
[ ] Healthcheck configured in Docker Compose
[ ] Resource limits (memory, CPU) set
[ ] docker stats monitored regularly
Further Reading — Docker Security Series
Running Redis in Docker is one piece of a larger container environment. To ensure your entire stack is properly secured, explore the Docker Security series on bckinfo.com:
- Docker Security Best Practices 2026: 15 Hardening Steps — the foundational guide to securing every container in your environment
- Docker Compose Security: Complete Hardening Guide for 2026 — secure the Compose stack that Redis runs inside: network isolation, secrets management, and resource limits
- Secure Docker Host: Complete Hardening Guide for 2026 — harden the machine running your Redis container before it goes anywhere near production
- Docker in Docker Security: Risks, Alternatives, and Safe Implementation Guide 2026 — if your CI/CD pipeline builds Docker images that include Redis, read this first
- Trivy Docker Security: How to Scan and Fix Container Vulnerabilities — scan the Redis image for CVEs before deploying it to production
- Redis is rarely the only data store in a production stack — it is commonly paired with a primary database like MongoDB for persistent storage. If your stack includes MongoDB alongside Redis, make sure your backup strategy is just as solid as your caching layer: MongoDB Backup: Complete Guide to Backing Up and Restoring Your Database.
Conclusion
Running Redis in Docker is straightforward for development, but production deployments require deliberate configuration. The most common mistakes — skipping persistent volumes, running without authentication, and exposing port 6379 publicly — are all easy to avoid with the patterns in this guide.
Start with the Docker Compose setup in section 6 as your baseline for any production or staging environment. It handles persistence, authentication, health checks, resource limits, and networking in a single file that is easy to version control and reproduce.
Have a specific Redis use case or Docker configuration you want to discuss? Leave a comment below.
Related posts:
 How to Containerize a Spring Boot Application Using Docker
 How To Install Docker On CentOS 7
 Setting Up an Ubuntu Docker Container with SSH Access
 How To Install Docker On Fedora 38
 How to Install Apache Iceberg on Docker: A Complete Guide
 Docker Compose Security: Complete Hardening Guide for 2026
[…] Update System Packages […]