How To Expand Ubuntu 24.04 LTS File System Volume On VM Ware
Expanding the file system on Ubuntu 24.04 LTS running on a VMware virtual machine is essential when you need additional storage space. This guide walks you through the step-by-step process to increase the disk size and extend the file system.
Use Case
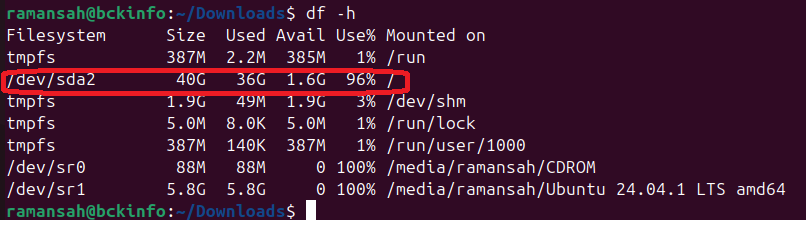
In a server or virtual machine (VM) environment, we often need to increase the storage capacity of the root (/) partition. This tutorial will guide you through expanding the root volume from 40GB to 60GB in Linux Ubuntu 24.04 LTS. The final capacity of root (/) partition will be 60GB as shown at the last of this tutorial.
Prerequisites
Before starting, ensure you have:
- Administrator access to VMware and Ubuntu.
- A backup of important data to prevent data loss.
- lsblk, fdisk, and resize2fs utilities installed (pre-installed on most Ubuntu versions).
Step 1: Increase Virtual Disk Size in VMware
- Power off the Ubuntu VM.
- Open VMware Workstation/ESXi/vSphere.
- Select the Ubuntu 24.04 VM.
- Navigate to VM Settings > Hard Disk.
- Click Expand Disk, enter the new size, and confirm.
- Power on the VM.
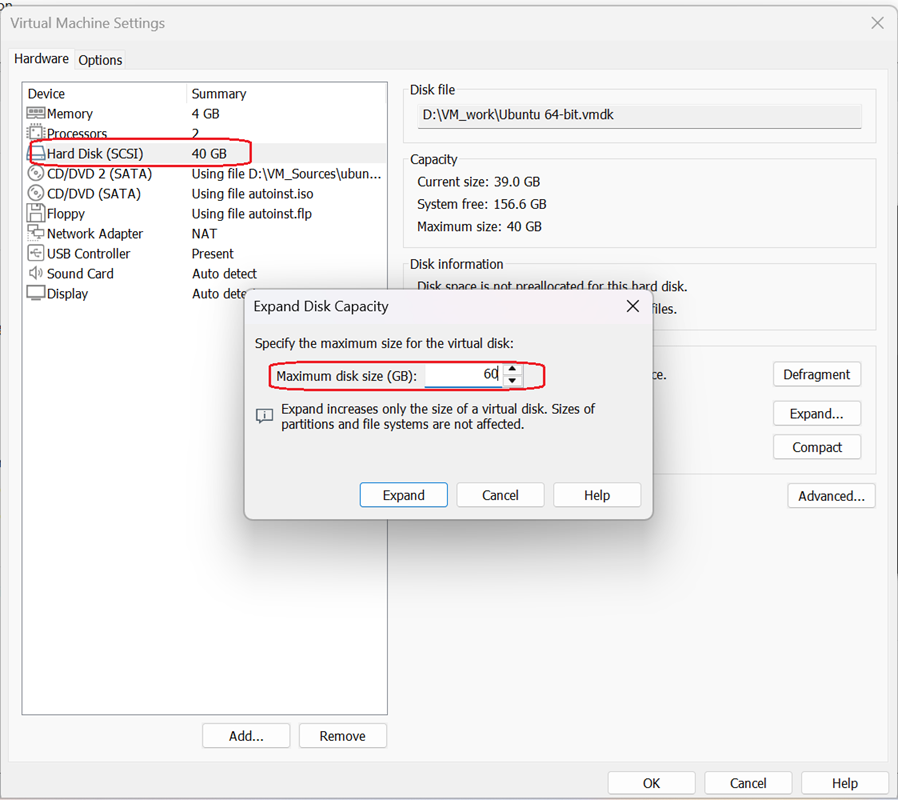
In VMware, right-click the VM, select ‘Virtual Machine Settings’, and choose the Hard Disk (SCSI), then click the ‘Expand …’ button. Enter the new desired size—for example, increasing from 40GB to 60GB—then confirm. Note: This only expands the virtual disk; the guest OS won’t see the space yet.
Step 2: Verify Disk Expansion in Ubuntu
After booting, check if the disk has increased:
lsblk
Look for the increased disk size under /dev/sda.
Disk /dev/sda: 60 GiB, 64424509440 bytes, 125829120 sectors
Disk model: VMware Virtual S
Units: sectors of 1 * 512 = 512 bytes
Sector size (logical/physical): 512 bytes / 512 bytes
I/O size (minimum/optimal): 512 bytes / 512 bytes
Disklabel type: gpt
Disk identifier: F4C611D3-FFE2-42E3-AFCF-AF3AEF4C5A96

Device        Start       End  Sectors Size Type
/dev/sda1      2048      4095     2048   1M BIOS boot
/dev/sda2      4096  83884031 83879936  40G Linux filesystem
/dev/sda3  83884032 125827071 41943040  20G Linux filesystem
Step 3: Resize the Partition
For MBR Partition Table, If using MBR, use fdisk:
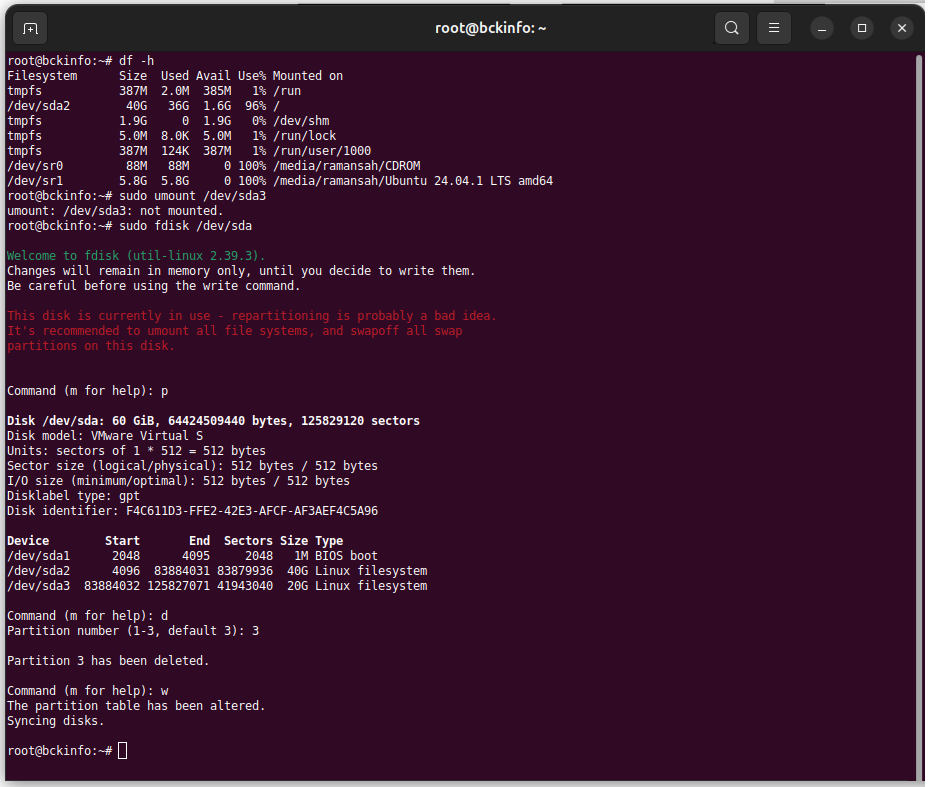
sudo fdisk /dev/sda

- Type `p` to print partitions.
- Delete (`d`) and recreate (`n`) the partition using the full space.
- Write changes with `w`.
- Reboot the system: `sudo reboot`
The output will be shown below :
root@bckinfo:~# fdisk /dev/sda
Welcome to fdisk (util-linux 2.39.3).
Changes will remain in memory only, until you decide to write them.
Be careful before using the write command.
This disk is currently in use - repartitioning is probably a bad idea.
It's recommended to umount all file systems, and swapoff all swap
partitions on this disk.
Command (m for help): p
Disk /dev/sda: 60 GiB, 64424509440 bytes, 125829120 sectors
Disk model: VMware Virtual S
Units: sectors of 1 * 512 = 512 bytes
Sector size (logical/physical): 512 bytes / 512 bytes
I/O size (minimum/optimal): 512 bytes / 512 bytes
Disklabel type: gpt
Disk identifier: F4C611D3-FFE2-42E3-AFCF-AF3AEF4C5A96
Device Start End Sectors Size Type
/dev/sda1 2048 4095 2048 1M BIOS boot
/dev/sda2 4096 83884031 83879936 40G Linux filesystem
Command (m for help): d
Partition number (1,2, default 2): 2
Partition 2 has been deleted.
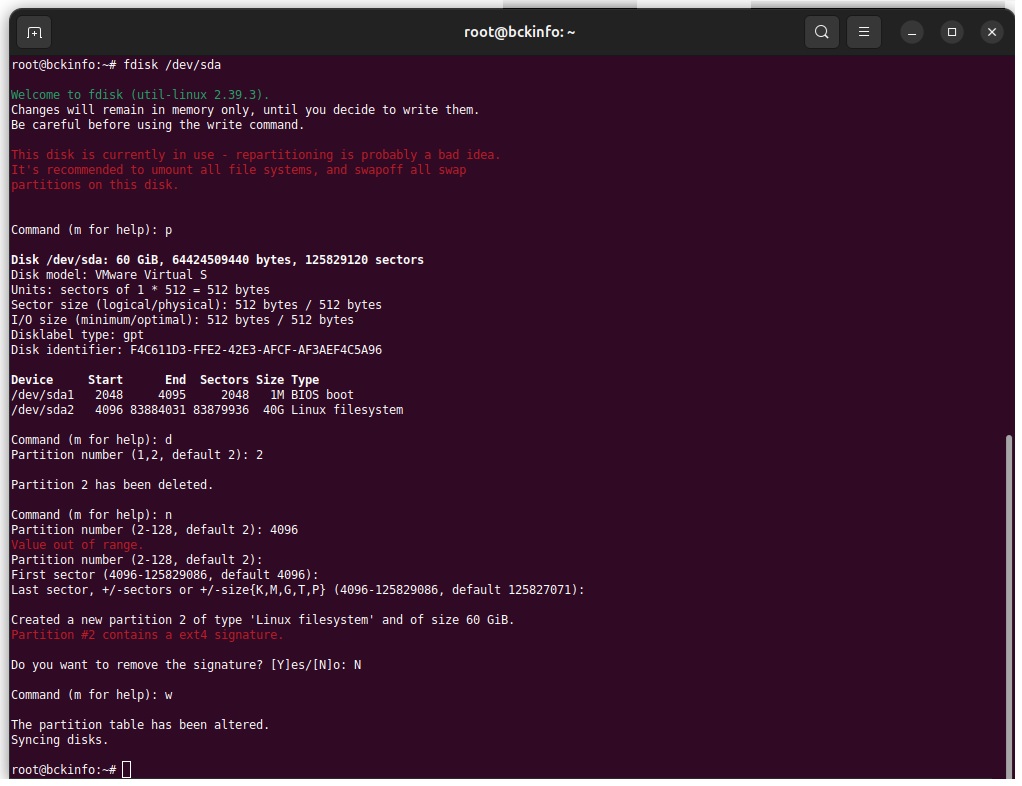
Command (m for help): n
Partition number (2-128, default 2): 4096
Value out of range.
Partition number (2-128, default 2):
First sector (4096-125829086, default 4096):
Last sector, +/-sectors or +/-size{K,M,G,T,P} (4096-125829086, default 125827071):
Created a new partition 2 of type 'Linux filesystem' and of size 60 GiB.
Partition #2 contains a ext4 signature.
Do you want to remove the signature? [Y]es/[N]o: N
Command (m for help): w
The partition table has been altered.
Syncing disks.
Step 4: Expand the File System
Once the partition is resized, extend the file system:
- For EXT4 File System
sudo resize2fs /dev/sda2
Output will be shown below :
root@bckinfo:~# resize2fs /dev/sda2
resize2fs 1.47.0 (5-Feb-2023)
Filesystem at /dev/sda2 is mounted on /; on-line resizing required
old_desc_blocks = 5, new_desc_blocks = 8
The filesystem on /dev/sda2 is now 15727872 (4k) blocks long.
Step 5: Verify Expansion
Check if the changes applied successfully:
df -h
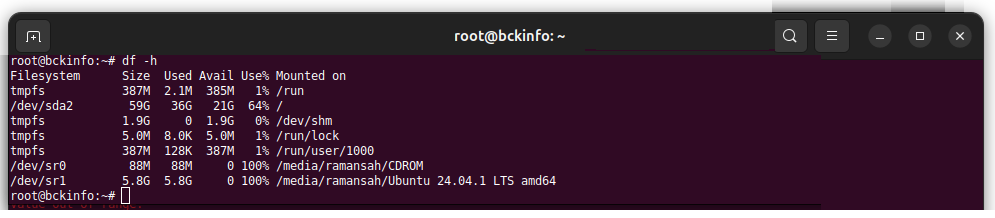
The root (/) partition should now reflect the increased size.
Conclusion
Expanding the file system on Ubuntu 24.04 LTS in VMware is a straightforward process when following these steps. This ensures your VM has adequate storage without requiring a fresh installation.
✅ FAQ Section (Ready to Paste into Your Article)
Frequently Asked Questions (FAQ)
1. Do I need to power off the VM before expanding the disk in VMware?
Yes. You should power off the Ubuntu virtual machine before increasing the disk size from the VMware settings to avoid potential data corruption.
2. Why can’t Ubuntu detect the new disk size immediately?
Expanding the virtual disk only increases the available storage at the hypervisor level. The guest operating system must verify the change using tools like lsblk before resizing partitions and file systems.
3. What command should I use to confirm the disk expansion?
Run:
lsblkThis command displays block devices and helps confirm whether the disk reflects the newly allocated size.
4. Is it necessary to back up data before expanding a file system?
Yes. Creating a backup is strongly recommended to prevent data loss during disk modification or partition resizing.
5. Which tools are required to expand a file system in Ubuntu 24.04?
Typical utilities include:
lsblk– to verify disk sizefdisk– to resize partitionsresize2fs– to extend the EXT4 file system
These tools are usually preinstalled on most Ubuntu systems.
6. Why doesn’t expanding the virtual disk automatically increase the root partition?
Increasing the disk size only adds unallocated space. You must manually resize the partition and extend the file system before the operating system can use the extra capacity.
7. How do I extend an EXT4 file system after resizing the partition?
Use the following command:
sudo resize2fs /dev/sda2This expands the file system so it can utilize the newly available storage.
8. How can I verify that the file system expansion was successful?
Run:
df -hThe root (/) partition should display the updated storage capacity.
9. Will expanding the file system require reinstalling Ubuntu?
No. When performed correctly, expanding a disk allows you to increase storage without reinstalling the operating system.
10. What is the biggest mistake to avoid when resizing partitions?
Avoid modifying partitions without understanding the layout or skipping backups. Improper changes can make disks unusable or cause permanent data loss.
Related posts:
 Changing Hostname on Rocky Linux 8
 Ubuntu 26.04 LTS Release: What to Expect from Canonical’s Next Long-Term Support Linux Distribution