How Install Apache Jmeter on Ubuntu 22.04 : Simple Guide

In this short tutorial, we will discuss about Apache Jmeter. Starting from how to install JMeter up to how to use Apache Jmeter. For a QA Engineer, carrying out a load/stress test or also known as a performance test is one of the main functions of the job. In carrying out performance testing, many tools can be used, one of which is JMeter. JMeter is a very powerful, user friendly, and open source performance testing tools, this tools is used to measure and analyze Web apps or website performance before going public. In addition, JMeter is also quite easy to install on several operating systems. We will install Apache JMeter on the Linux Ubuntu 22.04 operating system.
JMeter Installation on Ubuntu 20.04 LTS
There are two options can be used to install Apache JMeter, namely: APT package manager and Manual installation. Both methods will be explained in the following sub-chapters.
1. Installing Apache JMeter Using APT Package Manager
JMeter installation with this method is using the default system repository of Ubuntu 22.04 and the APT package manager. We will update our system repository package and install Apach JMeter based on it. By using this method, version of Jmeter available is not the latest one. The following steps will be taken to install JMeter using this method.
$ sudo apt update
$ sudo apt upgrade
$ sudo apt install jmeter
$ jmeter --version
Output :
ramans@infodiginet:~$ sudo apt update
[sudo] password for ramans:
Hit:1 http://id.archive.ubuntu.com/ubuntu jammy InRelease
Ign:2 http://download.webmin.com/download/repository sarge InRelease
Hit:3 http://security.ubuntu.com/ubuntu jammy-security InRelease
Hit:4 http://id.archive.ubuntu.com/ubuntu jammy-updates InRelease
Hit:5 http://id.archive.ubuntu.com/ubuntu jammy-backports InRelease
Hit:6 http://download.webmin.com/download/repository sarge Release
Hit:8 https://repos.influxdata.com/ubuntu jammy InRelease
Reading package lists... Done
Building dependency tree... Done
Reading state information... Done
4 packages can be upgraded. Run 'apt list --upgradable' to see them.
ramans@infodiginet:~$ sudo apt upgrade
Reading package lists... Done
Building dependency tree... Done
Reading state information... Done
Calculating upgrade... Done
#
# News about significant security updates, features and services will
# appear here to raise awareness and perhaps tease /r/Linux ;)
# Use 'pro config set apt_news=false' to hide this and future APT news.
#
The following packages have been kept back:
  xserver-common xserver-xephyr xserver-xorg-core xserver-xorg-legacy
0 upgraded, 0 newly installed, 0 to remove and 4 not upgraded.
ramans@infodiginet:~$ sudo apt install jmeter
Reading package lists... Done
Building dependency tree... Done
Reading state information... Done
The following additional packages will be installed:

0 upgraded, 63 newly installed, 0 to remove and 4 not upgraded.
Need to get 84,7 MB of archives.
After this operation, 244 MB of additional disk space will be used.
Do you want to continue? [Y/n] Y
. . .
Setting up jmeter (2.13-5) ...
Setting up jmeter-http (2.13-5) ...
Processing triggers for fontconfig (2.13.1-4.2ubuntu5) ...
Processing triggers for desktop-file-utils (0.26-1ubuntu3) ...
Processing triggers for hicolor-icon-theme (0.17-2) ...
Processing triggers for gnome-menus (3.36.0-1ubuntu3) ...
Processing triggers for man-db (2.10.2-1) ...
Processing triggers for mailcap (3.70+nmu1ubuntu1) ...
ramans@infodiginet:~$ jmeter --version
Copyright (c) 1998-2015 The Apache Software Foundation
Version 2.13.19691222
installing JMeter on Ubuntu 22.04 using the APT Manager method, resulting in the JMeter version 2.13.

2. Manual Installation Apache JMeter
By using manual installation method, we will be able to choose which version of JMeter we will install on our system. In this tutorial, we will use JMeter version 5.5. The following steps will be taken to install JMeter using manual installation method.
2.1 Install Java Runtime
Apache JMeter is based on Java and running on the system using Java runtime. For this purpose we have to prepare our system has had Java installed. We well verify by using command line :
$ java --version
Output :
ramans@infodiginet:~$ java --version
openjdk 11.0.17 2022-10-18
OpenJDK Runtime Environment (build 11.0.17+8-post-Ubuntu-1ubuntu222.04)
OpenJDK 64-Bit Server VM (build 11.0.17+8-post-Ubuntu-1ubuntu222.04, mixed mode, sharing)
2.2. Download Apache JMeter
As I mentioned above, if we will use Apache JMeter version 5.5. for our tutorial example. We will download Apache JMeter source, by using wget command line.
$ wget https://dlcdn.apache.org//jmeter/binaries/apache-jmeter-5.5.zip
Output :
ramans@infodiginet:~$ wget https://dlcdn.apache.org//jmeter/binaries/apache-jmeter-5.5.zip
--2022-12-06 22:25:59--  https://dlcdn.apache.org//jmeter/binaries/apache-jmeter-5.5.zip
Resolving dlcdn.apache.org (dlcdn.apache.org)... 151.101.2.132, 2a04:4e42::644
Connecting to dlcdn.apache.org (dlcdn.apache.org)|151.101.2.132|:443... connected.
HTTP request sent, awaiting response... 200 OK
Length: 88961114 (85M) [application/zip]
Saving to: ‘apache-jmeter-5.5.zip’

apache-jmeter-5.5.zip       100%[==========================================>]  84,84M  1,68MB/s    in 69s

2022-12-06 22:27:09 (1,23 MB/s) - ‘apache-jmeter-5.5.zip’ saved [88961114/88961114]
2.3. Setup JMeter
At this stage, we will extract JMeter source file, rename its directory and move it to the /opt/ directory. We will do the tasks in following steps below.
$ unzip apache-jmeter-5.5.zip
$ mv apache-jmeter-5.5 jmeter
$ sudo mv jmeter /opt/
Output :
ramans@infodiginet:~$ unzip apache-jmeter-5.5.zip
Archive:  apache-jmeter-5.5.zip
   creating: apache-jmeter-5.5/
  inflating: apache-jmeter-5.5/LICENSE
  inflating: apache-jmeter-5.5/NOTICE
   creating: apache-jmeter-5.5/licenses/
   creating: apache-jmeter-5.5/licenses/Saxon-HE-11.3.jar/
  inflating: apache-jmeter-5.5/licenses/Saxon-HE-11.3.jar/LICENSE
   creating: apache-jmeter-5.5/licenses/apiguardian-api-1.1.2.jar/
   creating: apache-jmeter-5.5/licenses/apiguardian-api-1.1.2.jar/META-INF/
  inflating: apache-jmeter-5.5/licenses/apiguardian-api-1.1.2.jar/META-INF/LICENSE
   creating: apache-jmeter-5.5/licenses/asm-9.3.jar/
. . .
inflating: apache-jmeter-5.5/docs/api/org/apache/log/Priority.html
  inflating: apache-jmeter-5.5/docs/api/org/apache/log/package-frame.html
  inflating: apache-jmeter-5.5/docs/api/org/apache/log/package-summary.html
  inflating: apache-jmeter-5.5/docs/api/org/apache/log/package-tree.html
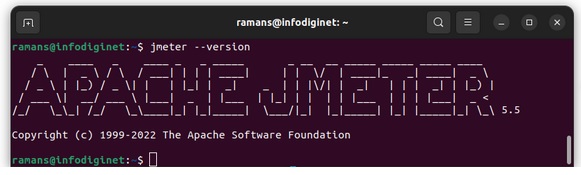
We will verify our Apache JMeter installed on the system, by submitting command line.
$ jmeter --version
ramans@infodiginet:~$ jmeter --version
    _    ____   _    ____ _   _ _____       _ __  __ _____ _____ _____ ____
   / \  |  _ \ / \  / ___| | | | ____|     | |  \/  | ____|_   _| ____|  _ \
  / _ \ | |_) / _ \| |   | |_| |  _|    _  | | |\/| |  _|   | | |  _| | |_) |
 / ___ \|  __/ ___ \ |___|  _  | |___  | |_| | |  | | |___  | | | |___|  _ <
/_/   \_\_| /_/   \_\____|_| |_|_____|  \___/|_|  |_|_____| |_| |_____|_| \_\ 5.5

Copyright (c) 1999-2022 The Apache Software Foundation
2.4. Adding JMeter to the System Path
To make it easier to access the JMeter application from anywhere on our desktop Ubuntu system. Then we have to include it in the system path. We will do the following steps.
$ echo ‘export PATH=”$PATH:/opt/jmeter/bin”‘ >> ~/.bashrc
$ source ~/.bashrc
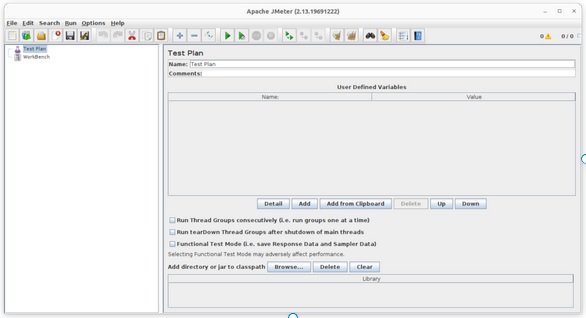
$ jmeter
2.5. Creating Desktop and Application Shortcut
To create a new shortcut for JMeter application we will update ~/Desktop/Jmeter.desktop file, and append several line as follow :
[Desktop Entry]
Version=1.0
Type=Application
Name=Apache-Jmeter
Comment=Testing
Exec=/opt/jmeter/bin/./jmeter.sh
Icon=/opt/jmeter/docs/images/jmeter_square.png
Terminal=false
StartupNotify=false
$ chmod 4775 ~/Desktop/Jmeter.desktop
Then, it will prompt the JMeter banner as shwon below :
Common Issues During JMeter Installation on Ubuntu 22.04 and Their Solutions
When installing Apache JMeter on Ubuntu 22.04, users may encounter several common issues that prevent the tool from running smoothly. One frequent problem is the “Java not found” or “Unsupported Java version” error, which happens when Java is either missing or outdated. JMeter requires a compatible Java environment (Java 8 or higher). To fix this, ensure you install the latest OpenJDK using the command sudo apt install openjdk-11-jdk and verify it with java -version. Another issue occurs when users install JMeter through APT and end up with an outdated version. In such cases, downloading the latest binary package directly from the official Apache JMeter website and extracting it manually is the recommended approach.
Another common problem is permission and path configuration errors after installation. Sometimes, users cannot launch JMeter because the environment variable JAVA_HOME is not set correctly or the executable file lacks execution permissions. To resolve this, set your Java environment path using export JAVA_HOME=/usr/lib/jvm/java-11-openjdk-amd64 and make sure JMeter’s startup script is executable by running chmod +x bin/jmeter. Additionally, if JMeter fails to start due to display issues in GUI mode, install the required graphical dependencies with sudo apt install xorg openbox. By following these fixes, you can ensure a smoother installation and operation of Apache JMeter on Ubuntu 22.04.
Conclusion
In this section, we have successfully installed Apache JMeter on an Ubuntu 22.04 Linux operating system. Base on this tutorial, we will have an understanding if we install Apache JMeter using APT Package manager we will get JMeter version 2.3 and if we install Apache JMeter using manual method we will have an options to choose what version of Apache JMeter we will install. I hope this tutorial will be helpful.