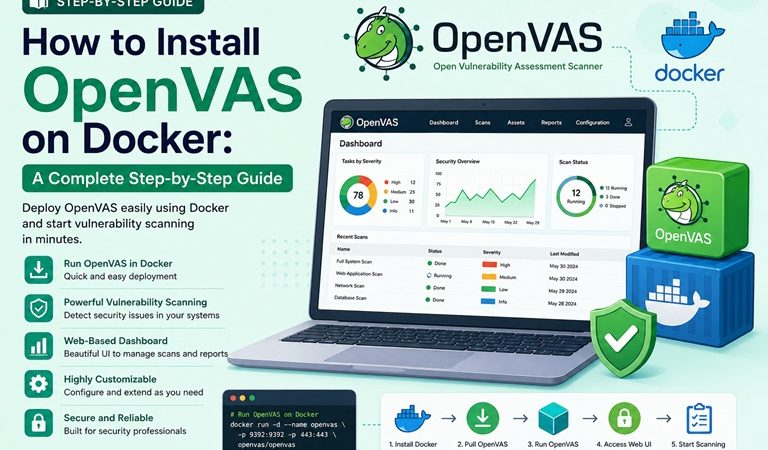
How to Install OpenVAS on Docker: A Complete Step-by-Step Guide
In today’s cybersecurity landscape, regular vulnerability scanning is no longer optional — it’s a necessity. Whether you’re a system administrator, a penetration tester, or a DevSecOps engineer, having a reliable vulnerability scanner in your toolkit is critical. OpenVAS (Open Vulnerability Assessment System), now part of the Greenbone Vulnerability Management (GVM) framework, is one of the most powerful open-source vulnerability scanners available.
However, installing OpenVAS natively can be complex and time-consuming, requiring specific dependencies and system configurations. That’s where Docker comes in. By running OpenVAS inside a Docker container, you get a clean, isolated, and easily reproducible environment — without the headache of dependency conflicts.
In this guide, you’ll learn how to install OpenVAS on Docker from scratch, configure it properly, and start your first vulnerability scan — all in under 30 minutes.
Estimated reading time: 10 minutes
What Is OpenVAS?
OpenVAS is a full-featured vulnerability scanner that originated as a fork of the Nessus scanner back in 2005. Today, it is maintained by Greenbone Networks and serves as the scanning engine within the Greenbone Vulnerability Management (GVM) suite.
OpenVAS performs:
- Network-based vulnerability detection
- CVE (Common Vulnerabilities and Exposures) checks
- Configuration auditing
- Compliance testing
- Authenticated and unauthenticated scans
The scanner uses a continuously updated Network Vulnerability Tests (NVT) feed, which currently contains over 160,000 vulnerability tests, making it one of the most comprehensive free scanners available.
Why Use Docker for OpenVAS?
Running OpenVAS natively on Linux requires installing multiple components: gvmd, openvas-scanner, ospd-openvas, gsa (web interface), and PostgreSQL. Managing all these pieces manually can lead to version conflicts and configuration errors.
Docker advantages:
- Isolated environment — no dependency conflicts with your host system
- Easy updates — pull a new image and restart
- Portability — run the same environment on any Docker-compatible host
- Reproducibility — identical setup across development, staging, and production
- Quick teardown — remove the container without leaving traces on the host
Prerequisites
Before you begin, make sure your system meets the following requirements:
System Requirements
| Component | Minimum | Recommended |
| CPU | 2 cores | 4+ cores |
| RAM | 4 GB | 8 GB or more |
| Disk Space | 20 GB | 40 GB or more |
| OS | Linux (Ubuntu/Debian/CentOS) | Ubuntu 22.04 LTS |
Software Requirements
- Docker Engine 20.10 or later
- Docker Compose v2.x or later
- A user with
sudoprivileges
Note: OpenVAS is resource-intensive, especially during feed synchronization. Ensure your system has at least 4 GB of RAM for a smooth experience.
Step 1: Install Docker Engine
If Docker is not yet installed, follow these steps for Ubuntu/Debian-based systems.
Update your package index
sudo apt update && sudo apt upgrade -yInstall required packages
sudo apt install -y \
    ca-certificates \
    curl \
    gnupg \
    lsb-release
Add Docker’s official GPG key
sudo mkdir -m 0755 -p /etc/apt/keyrings
curl -fsSL https://download.docker.com/linux/ubuntu/gpg | \
    sudo gpg --dearmor -o /etc/apt/keyrings/docker.gpg
Set up the Docker repository
echo \
  "deb [arch=$(dpkg --print-architecture) \
  signed-by=/etc/apt/keyrings/docker.gpg] \
  https://download.docker.com/linux/ubuntu \
  $(lsb_release -cs) stable" | \
  sudo tee /etc/apt/sources.list.d/docker.list > /dev/null
Install Docker Engine
sudo apt update
sudo apt install -y docker-ce docker-ce-cli containerd.io \
    docker-buildx-plugin docker-compose-plugin
Verify Docker installation
sudo docker run hello-worldIf Docker is working correctly, you’ll see a “Hello from Docker!” message.
(Optional) Run Docker without sudo
sudo usermod -aG docker $USER
newgrp docker
Step 2: Install Docker Compose
Docker Compose is typically included with modern Docker installations via the docker-compose-plugin. Verify it works:
docker compose versionExpected output:
Docker Compose version v2.x.xIf not available, install it manually:
sudo apt install -y docker-compose-pluginStep 3: Pull the Greenbone Community Edition Docker Image
The official and most reliable Docker image for OpenVAS/GVM is maintained by Greenbone as part of their Greenbone Community Edition (GCE).
Download the official Docker Compose file
Greenbone provides an official docker-compose.yml file for GCE deployment:
mkdir -p ~/openvas && cd ~/openvas
curl -fsSL https://greenbone.github.io/docs/latest/_static/docker-compose-22.4.yml \
    -o docker-compose.yml
Tip: Always check Greenbone’s official documentation for the latest compose file, as versions are updated regularly.
Review the Docker Compose file
cat docker-compose.ymlThe compose file defines the following services:
- vulnerability-tests — downloads NVT feeds
- notus-data — downloads Notus vulnerability data
- nasl-data — downloads NASL scripts
- scap-data — downloads SCAP security content
- cert-bund-data — downloads CERT-Bund data
- dfn-cert-data — downloads DFN-CERT data
- data-objects — synchronizes GVM data objects
- report-formats — downloads report format plugins
- gpg-data — Greenbone GPG key data
- redis-server — Redis in-memory data store
- pg-gvm — PostgreSQL database for GVM
- gvmd — Greenbone Vulnerability Manager daemon
- gsa — Greenbone Security Assistant (web UI)
- ospd-openvas — OSP daemon wrapping OpenVAS scanner
- openvas — the core scanner engine
- gvm-tools — command-line GVM tools
Step 4: Start the OpenVAS Stack
Now, bring up all services using Docker Compose:
docker compose -f docker-compose.yml -p greenbone-community-edition up -dThe -d flag runs all containers in detached (background) mode.
Monitor the startup logs
docker compose -p greenbone-community-edition logs -fPress Ctrl+C to stop following logs.
Important: The first startup will take 15–30 minutes or longer depending on your internet speed. The containers need to download and synchronize the vulnerability feed data (~1–2 GB). Do not interrupt this process.
Step 5: Monitor Feed Synchronization
Feed synchronization is the most time-consuming part of the setup. You can monitor the progress by checking individual container logs:
Check NVT feed sync progress
docker logs -f greenbone-community-edition-vulnerability-tests-1Check GVM daemon status
docker logs -f greenbone-community-edition-gvmd-1Verify all containers are running
docker compose -p greenbone-community-edition psYou should see all services with a status of Up or running.
Step 6: Access the Greenbone Security Assistant (Web UI)
Once all containers are running and the feeds are synchronized, you can access the web interface.
Get the default admin password
Greenbone’s Docker setup automatically generates a random admin password. Retrieve it with:
docker compose -p greenbone-community-edition \
    exec -u gvmd gvmd gvmd --get-users --verbose
Alternatively, you can reset the password manually:
docker compose -p greenbone-community-edition \
    exec -u gvmd gvmd gvmd \
    --user=admin --new-password='YourNewSecurePassword123!'
Open the web interface
Open your web browser and navigate to:
http://localhost:9392Or, if accessing from a remote machine, replace localhost with the server’s IP address:
http://<server-ip>:9392Login credentials
- Username:
admin - Password: (the password retrieved or set above)
Step 7: Configure a Vulnerability Scan
After logging in, you’ll see the Greenbone Security Assistant dashboard. Follow these steps to run your first scan.
Create a new Target
- Navigate to Configuration → Targets
- Click the blue star (New Target) icon
- Fill in the target details:
- Name: Give your target a descriptive name (e.g.,
Internal Network Scan) - Hosts: Enter IP addresses, ranges, or CIDR notation (e.g.,
192.168.1.0/24) - Port List: Select
All IANA assigned TCPfor a comprehensive scan
- Click Save
Create a new Task
- Navigate to Scans → Tasks
- Click the blue star (New Task) icon
- Configure the task:
- Name: Enter a task name
- Scan Config: Select
Full and fastfor a balanced scan - Target: Select the target you just created
- Scanner: Select
OpenVAS Default
- Click Save
Start the scan
- On the Tasks list, locate your newly created task
- Click the green play button to start the scan
- Monitor progress in the task list — the scan may take minutes to hours depending on network size
Step 8: View and Export Scan Reports
Once the scan completes, you can view and export detailed reports.
View results
- Navigate to Scans → Reports
- Click on the completed report to view vulnerabilities
- Results are categorized by severity: Critical, High, Medium, Low, Log
Export reports
GVM supports multiple report formats:
- PDF — shareable executive summary
- XML — raw machine-readable data
- CSV — spreadsheet-compatible format
- HTML — standalone web report
To export, open a report and click the download icon, then select your preferred format.
Step 9: Update OpenVAS Feeds Regularly
Vulnerability data must be kept up to date for accurate results. Update feeds periodically:
docker compose -p greenbone-community-edition \
    up -d --force-recreate vulnerability-tests notus-data \
    nasl-data scap-data cert-bund-data dfn-cert-data
For automated updates, add this command to a cron job:
crontab -eAdd the following line to update feeds every day at 2 AM:
0 2 * * * docker compose -p greenbone-community-edition \
    up -d --force-recreate vulnerability-tests notus-data \
    nasl-data scap-data cert-bund-data dfn-cert-data
Common Issues and Troubleshooting
Issue 1: Web UI not accessible
Symptom: Browser shows “connection refused” on port 9392.
Solution:
docker compose -p greenbone-community-edition psEnsure the gsa container is running. If not:
docker compose -p greenbone-community-edition restart gsaIssue 2: Feeds not syncing
Symptom: Scanner shows “No NVTs available” or scan results are empty.
Solution: Wait for feeds to fully synchronize (can take 30–60 min on first run). Check logs:
docker logs greenbone-community-edition-vulnerability-tests-1Issue 3: Container running out of memory
Symptom: Containers crash or restart repeatedly.
Solution: Ensure your host has at least 4 GB of RAM free. Consider adding swap:
sudo fallocate -l 4G /swapfile
sudo chmod 600 /swapfile
sudo mkswap /swapfile
sudo swapon /swapfile
Issue 4: PostgreSQL connection errors
Symptom: gvmd logs show database connection errors.
Solution: Restart the database container:
docker compose -p greenbone-community-edition restart pg-gvm
docker compose -p greenbone-community-edition restart gvmd
Issue 5: Login fails after password reset
Solution: Clear browser cookies and cache, then retry. If the issue persists, verify the password was set correctly using the --get-users command.
Stopping and Removing OpenVAS
Stop all containers (preserving data)
docker compose -p greenbone-community-edition stopRemove all containers (preserving volumes/data)
docker compose -p greenbone-community-edition downFull cleanup (removes containers AND data volumes)
docker compose -p greenbone-community-edition down -vWarning: The
-vflag removes all persistent data including your scan history and configurations.
Security Best Practices
Running a vulnerability scanner introduces its own security considerations. Keep these points in mind:
- Restrict port access — never expose port
9392directly to the internet. Use a VPN or SSH tunnel. - Change default credentials — always set a strong admin password immediately after installation.
- Use HTTPS — consider putting a reverse proxy (e.g., Nginx with Let’s Encrypt) in front of the GSA web interface.
- Scan only authorized targets — running OpenVAS against systems you don’t own or lack authorization to test is illegal in most jurisdictions.
- Keep Docker images updated — regularly pull the latest images to get security patches.
- Audit scan schedules — avoid running intensive scans during peak production hours.
Conclusion
Installing OpenVAS on Docker is a clean and efficient way to deploy a professional-grade vulnerability scanner without the complexity of a native installation. By following this guide, you’ve:
- Installed Docker Engine and Docker Compose
- Pulled and launched the official Greenbone Community Edition stack
- Synchronized the NVT vulnerability feed
- Accessed the web interface and configured your first scan
- Learned how to export reports and keep feeds updated
OpenVAS combined with Docker gives you a powerful, portable, and maintainable vulnerability management solution — whether you’re running it on a local VM, a dedicated server, or in the cloud.
Happy scanning — and stay secure! 🔐
Related posts:
 OpenVAS and Network Security: A Complete Guide to Vulnerability Scanning
 Trivy Docker Security: How to Scan and Fix Container Vulnerabilities
 Docker Compose Security: Complete Hardening Guide for 2026
 Docker in Docker Security: Risks, Alternatives, and Safe Implementation Guide 2026
 Docker Network Security: A Complete Guide to Securing Container Communication in 2026
 How To Run Commands Inside Docker Containers: A Step-by-Step Guide
 MongoDB with Docker Compose: Authentication, Replica Set, and Production-Ready Setup