How to Install CouchDB 3.5 on Rocky Linux 10.2: Docker, Source Build & Production Setup

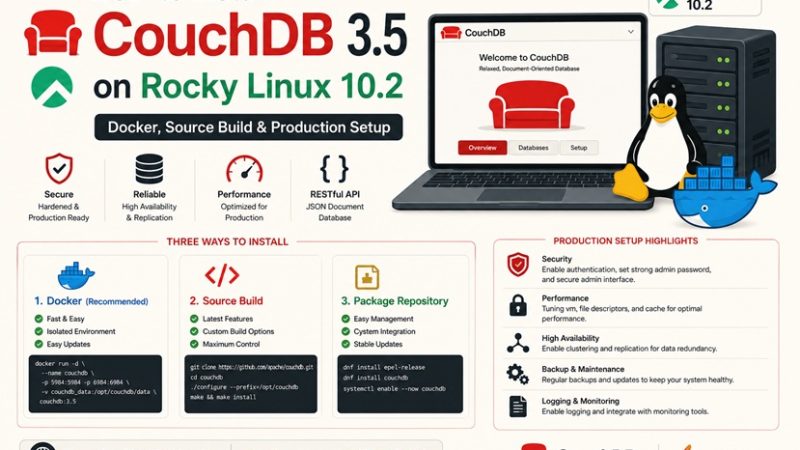
Apache CouchDB is a document-oriented NoSQL database that stores data as JSON documents, exposes everything over a plain HTTP API, and is built around multi-master replication — which makes it a strong fit for offline-first applications and distributed deployments. Installing it on Rocky Linux 10.2 comes with one significant catch that most tutorials skip: there is no official CouchDB RPM for EL10. This guide explains why, then covers the two methods that actually work.
Table of Contents
- The EL10 Packaging Gap (Read This First)
- Prerequisites
- Installation Method Comparison
- Architecture Overview
- Method A — Docker (Recommended)
- Method B — Build from Source
- Configure firewalld
- SELinux Considerations
- Nginx Reverse Proxy with SSL
- Verifying the Installation
- Basic CRUD with the HTTP API
- Backup and Restore
- Troubleshooting
- FAQ
- Related Articles
The EL10 Packaging Gap (Read This First)
The Apache CouchDB project publishes convenience binary packages for CentOS/RHEL 7, 8, and 9 only — EL10 is not on the supported list. Two problems block the obvious workaround of pointing the EL9 repository at a Rocky Linux 10 host:
- The CouchDB repo definition resolves
$releaseverto10, and noel10directory exists in the artifact repository. - Even with the path hardcoded to
9, the EL9 CouchDB package depends on mozjs78 (SpiderMonkey 78), which is installed from EPEL 9. Rocky Linux 10 ships a much newer SpiderMonkey, andmozjs78is not available in EPEL 10.
| Approach | Works on Rocky Linux 10.2? | Notes |
|---|---|---|
Official yum repo (couchdb.repo) | ❌ No | No el10 path published |
EL9 repo with hardcoded baseurl | ❌ No | Fails on the mozjs78 dependency |
| Docker container | ✅ Yes | Officially maintained image, recommended |
| Build from source | ✅ Yes | Works but requires Erlang + SpiderMonkey toolchain |
| Snap package | ⚠️ Partial | Requires snapd + EPEL; uncommon on RHEL-family servers |
Check the CouchDB installation docs before deploying — once the project publishes an
el10path, the native RPM route becomes the simpler option and this section becomes obsolete.
Prerequisites
- A Rocky Linux 10.2 server with at least 2 GB RAM and 10 GB free disk space
- A non-root user with
sudoprivileges - For Method A: Docker installed — see the Docker on Rocky Linux 10 with SELinux guide
- A domain name pointed at the server (for the Nginx + SSL section)
Installation Method Comparison
| Method | Setup Complexity | Update Path | Isolation | Best For |
|---|---|---|---|---|
| Docker (Method A) | Low | docker compose pull && up -d | Full container isolation | Production and development on EL10 — the practical default |
| Source build (Method B) | High | Manual rebuild per release | Shares host runtime | Hosts where containers aren’t permitted, or custom build flags are required |
Architecture Overview
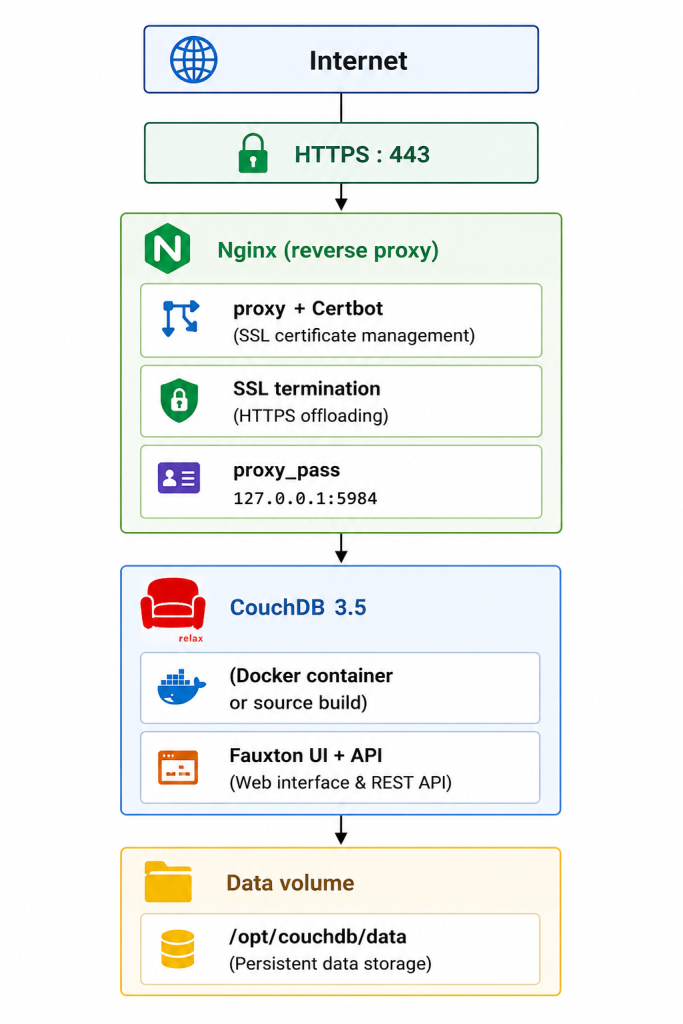
Method A — Docker (Recommended)
The official couchdb image is maintained by the CouchDB project and is the most reliable path on Rocky Linux 10.
1. Create the Compose file:
mkdir -p ~/couchdb && cd ~/couchdb
nano docker-compose.yml
services:
couchdb:
image: couchdb:3.5
container_name: couchdb
restart: always
ports:
- "127.0.0.1:5984:5984"
environment:
COUCHDB_USER: admin
COUCHDB_PASSWORD: change_me_to_a_strong_password
volumes:
- couchdb_data:/opt/couchdb/data
- couchdb_config:/opt/couchdb/etc/local.d
volumes:
couchdb_data:
couchdb_config:2. Start the container:
docker compose up -d
docker compose logs -f couchdb
COUCHDB_USERandCOUCHDB_PASSWORDare mandatory. CouchDB 3.0+ refuses to run without an admin user configured — the old “admin party” mode was removed in the 3.x series.
3. Initialize the system databases:
A fresh single-node install needs its internal databases created once:
curl -X PUT http://admin:change_me_to_a_strong_password@127.0.0.1:5984/_users
curl -X PUT http://admin:change_me_to_a_strong_password@127.0.0.1:5984/_replicator
Alternatively, set COUCHDB_SINGLE_NODE=true in the environment block to have the container handle this automatically on first boot.
Note on bind mounts and SELinux: the Compose file above uses named volumes, which avoid SELinux labeling issues entirely. If host bind mounts are preferred instead, append :Z to each mount (./data:/opt/couchdb/data:Z) so Docker applies the correct SELinux context — otherwise the container will hit permission-denied errors on an Enforcing host.
Method B — Build from Source
Use this only when containers aren’t an option. The build requires the Erlang/OTP and SpiderMonkey toolchain.
1. Enable CRB and EPEL:
sudo dnf config-manager --set-enabled crb
sudo dnf install -y epel-release
sudo dnf update -y
2. Install build dependencies:
sudo dnf install -y autoconf autoconf-archive automake \
    gcc-c++ libtool libicu-devel help2man perl-Test-Harness \
    erlang erlang-erts erlang-asn1 erlang-eunit \
    erlang-os_mon erlang-xmerl erlang-erl_interface \
    mozjs128-devel python3-sphinx
CouchDB 3.5 supports Erlang/OTP 26, 27, and 28, and SpiderMonkey versions up to 128 — match the --spidermonkey-version flag below to whichever mozjs*-devel package the system actually resolved.
3. Download and build:
cd /usr/local/src
sudo curl -LO https://downloads.apache.org/couchdb/source/3.5.0/apache-couchdb-3.5.0.tar.gz
sudo tar -xzf apache-couchdb-3.5.0.tar.gz
cd apache-couchdb-3.5.0

sudo ./configure --spidermonkey-version 128 --disable-docs
sudo make release
4. Create the couchdb user and install the release:
sudo useradd --system --shell /bin/bash --home-dir /opt/couchdb couchdb
sudo cp -R rel/couchdb /opt/
sudo chown -R couchdb:couchdb /opt/couchdb
sudo find /opt/couchdb -type d -exec chmod 0770 {} \;
sudo chmod 0644 /opt/couchdb/etc/*
5. Create the admin user before first start (CouchDB 3.x will not run without one):
sudo tee -a /opt/couchdb/etc/local.ini << 'EOF'
[admins]
admin = your_strong_password_here
CouchDB hashes this password on first startup and replaces the plaintext value in the file.
6. Create a systemd unit — CouchDB no longer ships daemonization scripts, so the unit has to be written manually:
sudo nano /etc/systemd/system/couchdb.service[Unit]
Description=Apache CouchDB
After=network.target
[Service]
Type=simple
User=couchdb
Group=couchdb
ExecStart=/opt/couchdb/bin/couchdb
Restart=always
RestartSec=5
StandardOutput=journal
StandardError=journal
SyslogIdentifier=couchdb
NoNewPrivileges=true
[Install]
WantedBy=multi-user.targetsudo systemctl daemon-reload
sudo systemctl enable --now couchdb
sudo systemctl status couchdbConfigure firewalld
CouchDB should never be exposed directly to the internet. Keep 5984 bound to localhost and expose only the Nginx ports:
sudo firewall-cmd --permanent --add-service=http
sudo firewall-cmd --permanent --add-service=https
sudo firewall-cmd --reload| Port | Protocol | Exposure | Purpose |
|---|---|---|---|
| 80 | tcp | Public | HTTP → HTTPS redirect, Certbot ACME challenge |
| 443 | tcp | Public | HTTPS traffic to Nginx |
| 5984 | tcp | Localhost only | CouchDB HTTP API + Fauxton UI |
| 4369 | tcp | Cluster nodes only | Erlang port mapper (clustered deployments only) |
SELinux Considerations
Rocky Linux 10.2 runs SELinux in Enforcing mode by default. Two things matter here:
For the Docker method — use named volumes (as in the Compose file above), or append :Z to bind mounts so Docker relabels them with the correct container context.
For the Nginx reverse proxy — Nginx cannot open an outbound connection to CouchDB until this boolean is set:
sudo setsebool -P httpd_can_network_connect 1Check for denials if anything fails to start after a configuration change:
sudo ausearch -m avc -ts recentNginx Reverse Proxy with SSL
sudo dnf install -y nginx
sudo systemctl enable --now nginx
sudo dnf install -y epel-release
sudo dnf install -y certbot python3-certbot-nginx
sudo nano /etc/nginx/conf.d/couchdb.confserver {
listen 80;
server_name couchdb.yourdomain.com;
location / {
proxy_pass http://127.0.0.1:5984;
proxy_http_version 1.1;
proxy_set_header Host $host;
proxy_set_header X-Real-IP $remote_addr;
proxy_set_header X-Forwarded-For $proxy_add_x_forwarded_for;
proxy_set_header X-Forwarded-Proto $scheme;
proxy_buffering off;
client_max_body_size 64M;
}
}sudo nginx -t
sudo systemctl reload nginx
sudo certbot --nginx -d couchdb.yourdomain.com
proxy_buffering offmatters for CouchDB’s continuous_changesfeed, which streams responses — buffering would break long-polling replication clients.
Verifying the Installation
curl http://admin:yourpassword@127.0.0.1:5984/A JSON response including a couchdb welcome field and the version number confirms the server is running. Then check cluster/setup health:
curl http://admin:yourpassword@127.0.0.1:5984/_upThe Fauxton web interface is available at /_utils — through the reverse proxy that becomes https://couchdb.yourdomain.com/_utils.
Basic CRUD with the HTTP API
Everything in CouchDB is an HTTP call, which makes it easy to verify from the shell:
export CDB="http://admin:yourpassword@127.0.0.1:5984"

# Create a database
curl -X PUT $CDB/testdb

# Insert a document
curl -X POST $CDB/testdb \
  -H "Content-Type: application/json" \
  -d '{"name":"sample","qty":10}'

# Read all documents
curl $CDB/testdb/_all_docs?include_docs=true

# Delete the database
curl -X DELETE $CDB/testdb
Updating a document requires its current _rev value — CouchDB uses MVCC, so every write must reference the revision it’s replacing.
Backup and Restore
CouchDB stores each database as a single .couch file, so a filesystem-level backup of the data directory works when the service is stopped:
# Docker method — back up the named volume
docker compose stop couchdb
docker run --rm -v couchdb_couchdb_data:/data -v /backup:/backup \
  alpine tar czf /backup/couchdb-$(date +%F).tar.gz -C /data .
docker compose start couchdb
For live backups without downtime, use CouchDB’s replication API to replicate to a second instance, or couchbackup for a logical per-database dump. Replication is generally the better production answer since it’s built into the database rather than bolted on.
Troubleshooting
| Symptom | Likely Cause | Fix |
|---|---|---|
dnf install couchdb fails with “No match for argument” | No EL10 package published — the core packaging gap | Use Method A (Docker) or Method B (source build) |
| Repo added but fails with “Cannot download repodata” | $releasever resolving to 10, no such path | Same as above — the EL10 path does not exist |
Source build fails on mozjs78 not found | Rocky Linux 10 ships a newer SpiderMonkey | Install mozjs128-devel and pass --spidermonkey-version 128 |
| CouchDB refuses to start, logs mention no admin configured | CouchDB 3.x requires an admin user before first start | Set COUCHDB_USER/COUCHDB_PASSWORD (Docker) or add an [admins] entry to local.ini (source) |
| Container hits permission denied on its data directory | SELinux context missing on a bind mount | Use named volumes, or append :Z to the bind mount |
| Nginx returns 502 Bad Gateway | SELinux blocking Nginx’s outbound connection | sudo setsebool -P httpd_can_network_connect 1 |
Replication or _changes feed stalls behind the proxy | Nginx buffering the streaming response | Set proxy_buffering off in the location block |
| Fauxton loads but API calls return 401 | Credentials not being passed, or admin not created | Verify with curl http://admin:pass@127.0.0.1:5984/_up |
FAQ
Is there an official CouchDB RPM package for Rocky Linux 10?
No. As of this writing the Apache CouchDB convenience binary repository publishes packages for CentOS/RHEL 7, 8 and 9 only. The EL9 package also depends on mozjs78, which is not available in Rocky Linux 10 repositories, so pointing the EL9 repo at an EL10 host will fail on the SpiderMonkey dependency. Docker is the practical deployment method on Rocky Linux 10.
Why must a CouchDB admin user be created before first start?
CouchDB 3.0 and later will not run without an admin user. Starting the server with no admin configured leaves it in “admin party” mode, which the 3.x series removed. With Docker this is handled by passing COUCHDB_USER and COUCHDB_PASSWORD environment variables at container creation.
What ports does CouchDB use?
CouchDB listens on port 5984 for the HTTP API and the Fauxton web interface. A clustered deployment additionally uses 5986 for the node-local API on older versions, 4369 for the Erlang port mapper daemon, and a configurable range for inter-node Erlang distribution traffic.
Related posts:
 How to Install MongoDB 8.0 on Rocky Linux 10.2: Complete Setup Guide with SELinux & Authentication
 How to Install n8n on Rocky Linux 10.2: Native, Docker & Systemd Setup Guide
 How To Install Apache CouchDB on CentOS 8 step-by-step guide
 How To Install MongoDB 5.0 On Rocky Linux 8
Apache CouchDB: A Versatile and Scalable NoSQL Database Solution
How To Install MongoDB 5.0 On Rocky Linux 8
Apache CouchDB: A Versatile and Scalable NoSQL Database Solution
 How To Install Apache HBase on Docker (Complete Step-by-Step Guide)
 MongoDB Backup: Complete Guide to Backing Up and Restoring Your Database in 2026
 How to Run Redis on Kubernetes Using StatefulSet
