How to Set Up a Kubernetes Cluster on Rocky Linux 10 with kubeadm (SELinux & firewalld)

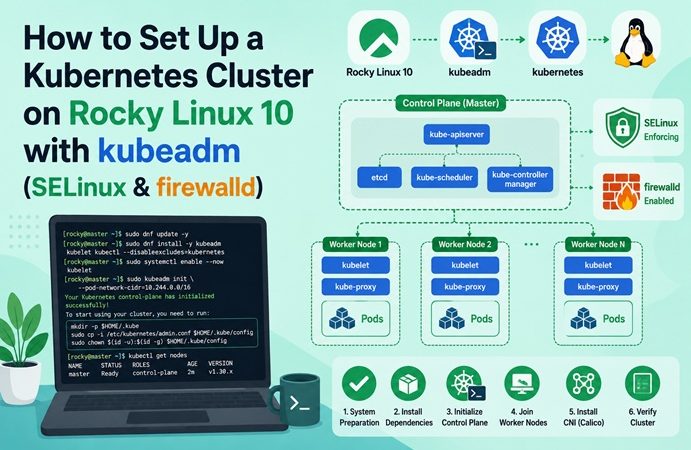
This is the second article in our Rocky Linux + Docker/Kubernetes cluster, following installing Docker on Rocky Linux 10 with SELinux. Here we go one layer up the stack: a real kubeadm cluster — one control plane, one or more workers — running containerd, Calico, explicit firewalld rules, and an honest treatment of what SELinux enforcing actually costs you with kubelet (spoiler: unlike Docker, this one has real trade-offs worth knowing before you commit).
Table of Contents
- Architecture Overview
- Prerequisites
- Step 1: Base OS Preparation (All Nodes)
- Step 2: Disable Swap and Load Kernel Modules
- Step 3: Install containerd
- Step 4: Install kubeadm, kubelet, kubectl
- Step 5: Configure firewalld
- Step 6: SELinux — What Enforcing Actually Requires
- Step 7: Initialize the Control Plane
- Step 8: Install the Calico CNI
- Step 9: Join Worker Nodes
- Step 10: Verify the Cluster
- Troubleshooting
- Related Articles
- FAQ
Architecture Overview
                         ┌───────────────────────────┐
                         │   Control Plane (cp-1)    │
                         │  kube-apiserver :6443     │
                         │  etcd :2379-2380          │
                         │  scheduler :10259         │
                         │  controller-mgr :10257    │
                         └──────────────┬────────────┘
                                        │
                     firewalld: 6443, 2379-2380,
                     10250, 10257, 10259 (TCP)
                                        │
              ┌─────────────────────────┼─────────────────────────┐
              │                         │                         │
      ┌───────▼────────┐       ┌────────▼───────┐       ┌────────▼───────┐
      │  Worker 1      │       │  Worker 2      │       │  Worker N      │
      │ kubelet :10250 │       │kubelet :10250  │       │kubelet :10250  │
      │  NodePort      │       │  NodePort      │       │  NodePort      │
      │  30000-32767   │       │  30000-32767   │       │  30000-32767   │
      └────────────────┘       └────────────────┘       └────────────────┘

      All nodes: containerd + Calico CNI (VXLAN overlay, pod CIDR 192.168.0.0/16)
Prerequisites
| Requirement | Detail |
|---|---|
| Nodes | 1 control plane + 1 or more workers (Rocky Linux 10.0–10.2) |
| Per-node specs | 2 vCPU / 2 GB RAM minimum for control plane; 2 GB RAM for workers |
| Networking | All nodes can reach each other; unique hostname and MAC per node |
| Access | Root or sudo on every node |
| Container runtime | containerd (this guide does not use Docker as the CRI — see the Docker vs containerd note) |
Step 1: Base OS Preparation (All Nodes)
Run this on the control plane and every worker:
sudo dnf update -y
sudo hostnamectl set-hostname cp-1        # adjust per node: worker-1, worker-2, ...
Add every node to /etc/hosts on every node so hostname resolution doesn’t depend on DNS:
sudo tee -a /etc/hosts <<EOF
10.0.0.10 cp-1
10.0.0.11 worker-1
10.0.0.12 worker-2
EOF
Step 2: Disable Swap and Load Kernel Modules
kubeadm refuses to initialize with swap enabled. Disable it permanently:
sudo swapoff -a
sudo sed -i '/ swap / s/^/#/' /etc/fstab
Load the modules kubelet’s networking depends on, and make them persistent across reboots:
cat <<EOF | sudo tee /etc/modules-load.d/k8s.conf
overlay
br_netfilter
EOF
sudo modprobe overlay
sudo modprobe br_netfilter

cat <<EOF | sudo tee /etc/sysctl.d/k8s.conf
net.bridge.bridge-nf-call-iptables = 1
net.bridge.bridge-nf-call-ip6tables = 1
net.ipv4.ip_forward = 1
EOF
sudo sysctl --system
Step 3: Install containerd
sudo dnf config-manager --add-repo https://download.docker.com/linux/rhel/docker-ce.repo
sudo dnf install -y containerd.io
Generate a default config and switch to the systemd cgroup driver — kubelet expects this, and skipping it is one of the most common causes of kubelet crash-looping after join:
sudo containerd config default | sudo tee /etc/containerd/config.toml
sudo sed -i 's/SystemdCgroup = false/SystemdCgroup = true/' /etc/containerd/config.toml
sudo systemctl restart containerd
sudo systemctl enable containerd
Step 4: Install kubeadm, kubelet, kubectl
Add the Kubernetes package repository (v1.35) and install the three binaries with version locking so a stray dnf upgrade doesn’t silently break your cluster:
cat <<EOF | sudo tee /etc/yum.repos.d/kubernetes.reponame=Kubernetes baseurl=https://pkgs.k8s.io/core:/stable:/v1.35/rpm/ enabled=1 gpgcheck=1 gpgkey=https://pkgs.k8s.io/core:/stable:/v1.35/rpm/repodata/repomd.xml.key EOF sudo dnf install -y kubelet kubeadm kubectl –disableexcludes=kubernetes sudo dnf versionlock kubelet kubeadm kubectl sudo systemctl enable –now kubelet
kubelet will crash-loop until kubeadm init runs — that’s expected at this stage.
Step 5: Configure firewalld
Rocky Linux runs firewalld by default. Skipping this step is the single most common reason join commands hang with no useful error message.
On the control plane:
sudo firewall-cmd --permanent --add-port={6443,2379-2380,10250,10257,10259}/tcp
sudo firewall-cmd --permanent --add-port=179/tcp    # Calico BGP (if using BGP mode)
sudo firewall-cmd --permanent --add-port=4789/udp   # Calico VXLAN
sudo firewall-cmd --reload
On every worker:
sudo firewall-cmd --permanent --add-port={10250,30000-32767}/tcp
sudo firewall-cmd --permanent --add-port=4789/udp
sudo firewall-cmd --reload| Port | Component | Node type |
|---|---|---|
| 6443/tcp | kube-apiserver | Control plane |
| 2379-2380/tcp | etcd | Control plane |
| 10250/tcp | kubelet API | All nodes |
| 10257/tcp | kube-controller-manager | Control plane |
| 10259/tcp | kube-scheduler | Control plane |
| 4789/udp | Calico VXLAN | All nodes |
| 30000-32767/tcp | NodePort services | Worker nodes |
Step 6: SELinux — What Enforcing Actually Requires
Be clear-eyed about this one, unlike the Docker install. With Docker CE, container-selinux plus :z/:Z volume flags gets you fully enforcing with no real friction. kubeadm-based kubelet is a different situation — the upstream Kubernetes project does not ship a complete SELinux policy for kubelet’s own file access patterns, and most production guides (including RHEL’s own kubeadm documentation) still default to permissive.
You have two honest options:
Option A — Permissive (what most guides use, least friction):
sudo setenforce 0
sudo sed -i 's/^SELINUX=enforcing$/SELINUX=permissive/' /etc/selinux/config
This is a real trade-off, not a shortcut — document it in your change control if this is a regulated environment.
Option B — Stay enforcing, label the specific paths kubelet/etcd touch:
sudo mkdir -p /var/lib/etcd /etc/kubernetes/pki
sudo chcon -R -t svirt_sandbox_file_t /var/lib/etcd
sudo chcon -R -t svirt_sandbox_file_t /etc/kubernetes/pki
sudo chcon -R -t container_file_t /var/lib/kubelet
sudo chcon -R -t container_file_t /run/containerd/
Option B gets a working enforcing cluster in testing, but expect to hit and re-label additional paths as you add CSI drivers, Ingress controllers, or anything that writes outside these directories — treat it as an ongoing tuning process, not a one-time fix. For a homelab or CI cluster, Option A is the pragmatic choice; for a security-audited production build, Option B with audit2allow monitoring is worth the extra effort.
Step 7: Initialize the Control Plane
Run only on cp-1:
sudo kubeadm init \
  --pod-network-cidr=192.168.0.0/16 \
  --apiserver-advertise-address=10.0.0.10
The pod CIDR 192.168.0.0/16 matches Calico’s default — change it here if you use a different CNI or need a non-overlapping range.
Copy the join command kubeadm prints at the end — you’ll need it for Step 9. Then set up kubectl for your user:
mkdir -p $HOME/.kube
sudo cp -i /etc/kubernetes/admin.conf $HOME/.kube/config
sudo chown $(id -u):$(id -g) $HOME/.kube/config
Step 8: Install the Calico CNI
Still on cp-1:
kubectl apply -f https://raw.githubusercontent.com/projectcalico/calico/v3.30.3/manifests/calico.yamlWait for Calico’s pods to reach Running:
kubectl get pods -n kube-system -wThe control plane node stays NotReady until the CNI is fully up — this is normal, not a fault.
Step 9: Join Worker Nodes
On each worker, run the kubeadm join command saved from Step 7:
sudo kubeadm join 10.0.0.10:6443 \
  --token <token> \
  --discovery-token-ca-cert-hash sha256:<hash>
Lost the token or it expired (they last 24 hours by default)? Regenerate it from the control plane:
kubeadm token create --print-join-commandStep 10: Verify the Cluster
From the control plane:
kubectl get nodes -o wide
kubectl get pods -A
All nodes should show Ready, and every pod in kube-system should be Running. Confirm scheduling works end-to-end:
kubectl create deployment nginx-test --image=nginx
kubectl expose deployment nginx-test --port=80 --type=NodePort
kubectl get svc nginx-test
Troubleshooting
| Symptom | Likely Cause | Fix |
|---|---|---|
kubeadm init fails: “swap is enabled” | Swap not disabled | Re-run Step 2, confirm with free -h |
kubelet crash-looping before kubeadm init | Expected — kubelet needs cluster config to start cleanly | Ignore until after Step 7 |
Worker NotReady after join | CNI not yet applied, or SystemdCgroup mismatch | Confirm Step 8 completed; check containerd config.toml has SystemdCgroup = true |
kubeadm join hangs with no error | firewalld blocking port 6443 or 10250 | Re-check Step 5 rules on both nodes |
Failed to create pod sandbox | Missing/misconfigured CNI, or SELinux denial on container_file_t paths | Check kubectl get pods -n kube-system; re-run Step 6 Option B labeling |
| etcd fails to start with permission errors | SELinux enforcing without svirt_sandbox_file_t on /var/lib/etcd | Apply Step 6 Option B, or switch to Option A |
| Join token expired | Default 24h TTL passed | kubeadm token create --print-join-command on control plane |
FAQ
Do I need Docker installed to run Kubernetes on Rocky Linux?
No. This guide uses containerd directly as the CRI. Docker CE (from our companion article) is a separate, standalone use case — Kubernetes has not used the Docker daemon as its runtime since the dockershim removal in v1.24.
Should I set SELinux to permissive for Kubernetes on Rocky Linux?
Most production kubeadm guides do, because kubelet lacks a complete upstream SELinux policy. Staying enforcing is possible with manual path labeling (Step 6, Option B) but requires ongoing maintenance as you add components.
Why does my control plane node stay NotReady?
This is expected until the CNI (Calico, in this guide) is applied and its pods reach Running. Check kubectl get pods -n kube-system before assuming something is broken.
Can I use this guide for a single-node cluster?
Yes — skip the worker steps and remove the control-plane taint with kubectl taint nodes --all node-role.kubernetes.io/control-plane-.
Related posts:
 Longhorn Persistent Storage on Rocky Linux 10 Kubernetes
 Install and Configure K3s with NVIDIA GPU Operator on Ubuntu 22.04
 Top 15 Kubernetes Interview Questions and Answers for Beginners (2025)
 How to Install Kubernetes Cluster on Ubuntu 26.04 LTS Using kubeadm (2026 Guide)
 How to Install Helm on Ubuntu 26.04 LTS (Complete Guide 2026)
 Kubernetes Services: ClusterIP, NodePort, LoadBalancer, and ExternalName Explained
 How to Deploy a Highly Available Kubernetes Cluster with Keepalived and HAProxy (2026 Guide)
 How to Install Docker on Rocky Linux 10 with SELinux (Complete 2026 Guide)
