Kubernetes Services: ClusterIP, NodePort, LoadBalancer, and ExternalName Explained

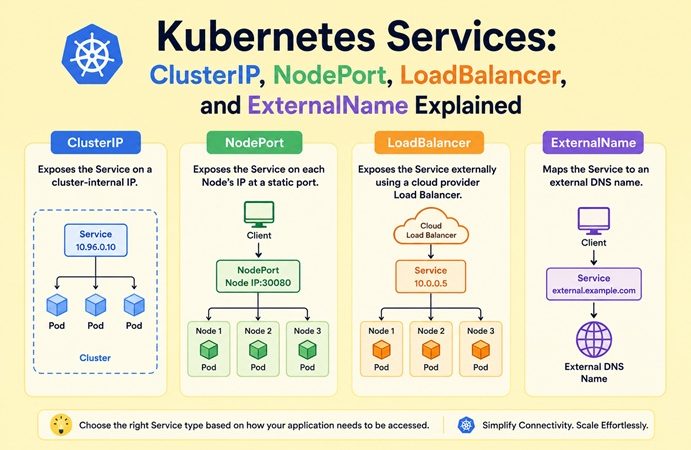
Table of Contents
- Why Kubernetes Services Exist
- How a Service Works: Selectors, Endpoints, and kube-proxy
- Service Type 1: ClusterIP (Default)
- Service Type 2: NodePort
- Service Type 3: LoadBalancer
- Service Type 4: ExternalName
- Headless Service: A Special Case
- Service Types Build on Each Other
- Side-by-Side Comparison Table
- Traffic Flow for Each Service Type
- Real-World Architecture: All Types Working Together
- externalTrafficPolicy: Local vs Cluster
- Service Discovery and DNS
- Services vs Ingress: When to Use Which
- Common Issues and Quick Fixes
- Frequently Asked Questions
- Next Steps
A Service in Kubernetes is a logical abstraction that provides a stable network endpoint for a set of pods. Since pod IPs are dynamic — changing every time a pod restarts or gets rescheduled — a Service ensures consistent networking and load balancing across multiple pod replicas.
Without Services, communicating with a pod means knowing its IP address, which changes every time the pod restarts. A Service solves this permanently: it gives you a stable DNS name and IP address that always routes to the right pods, regardless of how many times they restart or get rescheduled.
The choice of which type of Service determines who can reach your application and how:
- ClusterIP — internal cluster traffic only
- NodePort — external traffic via node IPs and high ports
- LoadBalancer — external traffic via a dedicated IP/load balancer
- ExternalName — map a cluster DNS name to an external service
Why Kubernetes Services Exist
Consider a simple three-pod deployment:
Before Service:
  Pod A (10.244.1.5)  ← restarts → now 10.244.2.9   ← different IP!
  Pod B (10.244.1.6)  ← restarts → now 10.244.3.2
  Pod C (10.244.2.3)  ← restarts → now 10.244.1.8

Other pods that hardcoded those IPs → all broken
If communication is based on pod IP addresses, any pod restart or rescheduling leads to IP changes, breaking existing connections and causing service disruptions.
A Service creates a virtual IP (called ClusterIP) that never changes, backed by a constantly updated list of healthy pod endpoints:
After Service:
  Service "backend" → ClusterIP: 10.96.0.100 (stable, never changes)
      ↓ load balances across ↓
  Pod A (10.244.1.5)
  Pod B (10.244.1.6)
  Pod C (10.244.2.3)

Other pods connect to 10.96.0.100 → always works, regardless of pod restarts
How a Service Works: Selectors, Endpoints, and kube-proxy
Understanding the mechanics under the hood makes troubleshooting far easier.
Step 1: Label Selector
A Service uses a label selector to find its pods. It continuously watches the cluster for pods matching those labels:
# The Service selects pods with app=backend
apiVersion: v1
kind: Service
metadata:
  name: backend
spec:
  selector:
    app: backend      # Match pods with this label
  ports:
    - port: 80
      targetPort: 8080
# The Deployment's pod template must have matching labels
apiVersion: apps/v1
kind: Deployment
metadata:
name: backend
spec:
template:
metadata:
labels:
app: backend # This matches the Service selector
spec:
containers:
- name: backend
image: myapp:1.0
ports:
- containerPort: 8080Step 2: Endpoints object
Kubernetes automatically creates an Endpoints object that lists the IPs of all healthy matching pods:
kubectl get endpoints backend
# NAME      ENDPOINTS                                    AGE
# backend   10.244.1.5:8080,10.244.1.6:8080,10.244.2.3:8080   5m
When a pod becomes unhealthy or restarts, its IP is automatically removed from the Endpoints list and replaced — the Service selector handles this continuously.
Step 3: kube-proxy
kube-proxy runs on every node and programs iptables (or IPVS) rules to forward traffic destined for the Service’s ClusterIP to one of the pod IPs in the Endpoints list.
Client pod sends request to 10.96.0.100:80
    ↓
kube-proxy's iptables rule intercepts
    ↓
NAT: rewrites destination to one of [10.244.1.5:8080, 10.244.1.6:8080, 10.244.2.3:8080]
    ↓
Packet reaches the selected pod
The client never knows which pod it’s talking to — that’s the abstraction Services provide.
Service Type 1: ClusterIP (Default)
ClusterIP creates an internal IP address accessible only within the cluster. No external traffic can reach it directly.
ClusterIP is the default when you don’t specify a type — and it’s the right choice for the vast majority of services in any cluster.
# clusterip-service.yaml
apiVersion: v1
kind: Service
metadata:
  name: backend-api
  namespace: production
spec:
  type: ClusterIP    # Optional — ClusterIP is the default
  selector:
    app: backend-api
  ports:
    - name: http
      port: 80           # Port the Service listens on (inside the cluster)
      targetPort: 8080   # Port the pod actually listens on
      protocol: TCP
kubectl apply -f clusterip-service.yaml
kubectl get svc backend-api
# NAME TYPE CLUSTER-IP EXTERNAL-IP PORT(S)
# backend-api ClusterIP 10.96.12.34 <none> 80/TCPEXTERNAL-IP shows <none> — that’s correct and expected for ClusterIP. This service is intentionally not reachable from outside the cluster.
Who can reach a ClusterIP Service:
✅ Other pods in the same namespace:
   curl http://backend-api:80

✅ Pods in other namespaces (using FQDN):
   curl http://backend-api.production.svc.cluster.local:80

❌ External traffic (browsers, other servers, internet):
   Not reachable — by design
When to use ClusterIP:
- Database services (PostgreSQL, MySQL, Redis, MongoDB) — should never be directly exposed
- Internal microservices that only need to talk to other microservices
- APIs consumed by a frontend running in the same cluster
- Any service that doesn’t need external access
Test a ClusterIP Service from inside the cluster:
# Run a temporary pod and curl the service
kubectl run curl-test --image=curlimages/curl --rm -it --restart=Never \
  -- curl http://backend-api.production.svc.cluster.local:80
Service Type 2: NodePort
NodePort builds on top of ClusterIP by opening a specific port on every node in your cluster. This allows external traffic to reach your service by hitting any node’s IP address on that port.
# nodeport-service.yaml
apiVersion: v1
kind: Service
metadata:
  name: web-frontend
  namespace: production
spec:
  type: NodePort
  selector:
    app: web-frontend
  ports:
    - name: http
      port: 80           # ClusterIP port (for internal access)
      targetPort: 3000   # Pod port
      nodePort: 30080    # Port opened on every node (30000-32767)
                         # Omit this to let Kubernetes assign one automatically
kubectl apply -f nodeport-service.yaml
kubectl get svc web-frontend
# NAME TYPE CLUSTER-IP EXTERNAL-IP PORT(S)
# web-frontend NodePort 10.96.45.67 <none> 80:30080/TCPThe 80:30080 format means: port 80 internally (ClusterIP), port 30080 on every node.
Access from outside the cluster:
# Access via any node's IP on the NodePort
curl http://192.168.1.10:30080    # via node 1
curl http://192.168.1.11:30080    # via node 2 — same service
curl http://192.168.1.12:30080    # via node 3 — same service
Traffic flow:
External client → 192.168.1.10:30080
    ↓
kube-proxy on node 1 intercepts
    ↓
NAT to Service ClusterIP → load balances to any pod on any node
    ↓
Pod receives request
When to use NodePort:
- Quick external access during development and testing
- Non-HTTP services that can’t go through an Ingress controller (database admin UIs, gRPC, MQTT, etc.)
- Environments where you control a load balancer in front of the cluster (HAProxy, Nginx on a separate machine)
- Situations where you don’t have a cloud provider’s LoadBalancer available
Why NOT to use NodePort in production:
- Port range limited to 30000-32767 — can’t use standard ports 80/443
- External traffic must target a specific node IP — that node becomes a single point of failure unless you put a load balancer in front
- Multiple NodePort services accumulate into many ports to manage and firewall
Service Type 3: LoadBalancer
LoadBalancer works on top of NodePort. It uses a cloud provider’s native load balancer to distribute traffic and assigns a public IP for clients to connect to.
# loadbalancer-service.yaml
apiVersion: v1
kind: Service
metadata:
  name: web-app
  namespace: production
  annotations:
    # Cloud provider-specific annotations (examples)
    # AWS:
    # service.beta.kubernetes.io/aws-load-balancer-type: "nlb"
    # GCP:
    # cloud.google.com/load-balancer-type: "External"
    # Azure:
    # service.beta.kubernetes.io/azure-load-balancer-internal: "false"
spec:
  type: LoadBalancer
  selector:
    app: web-app
  ports:
    - name: http
      port: 80
      targetPort: 8080
    - name: https
      port: 443
      targetPort: 8443
kubectl apply -f loadbalancer-service.yaml
# On cloud providers — EXTERNAL-IP populates within 1-2 minutes
kubectl get svc web-app
# NAME TYPE CLUSTER-IP EXTERNAL-IP PORT(S)
# web-app LoadBalancer 10.96.78.90 34.123.45.67 80:31234/TCP,443:31235/TCP
# Test via the external IP
curl http://34.123.45.67Traffic flow:
External client → 34.123.45.67:80 (cloud load balancer)
    ↓
Cloud LB forwards to any node's NodePort (auto-created: 31234)
    ↓
kube-proxy NATs to Service ClusterIP
    ↓
Load balances to a pod
On bare metal (no cloud provider):
The EXTERNAL-IP stays <pending> forever without a cloud provider. MetalLB solves this by providing a software load balancer implementation for bare metal — see our Install MetalLB on Bare Metal Kubernetes guide for the complete setup.
When to use LoadBalancer:
- Production services that need a stable public IP
- Services where you want cloud-provider-managed health checks and routing
- Non-HTTP traffic (TCP/UDP) that can’t go through an Ingress controller (game servers, VoIP, streaming)
- Each service that genuinely needs its own dedicated public IP
Cost consideration:
Each LoadBalancer service provisions a separate cloud load balancer, which incurs additional cost. For HTTP/HTTPS services, it’s more cost-efficient to use a single LoadBalancer for the Ingress Controller and route traffic via Ingress rules.
For most HTTP/HTTPS services: one LoadBalancer for the Ingress Controller → many Ingress rules → many services. This is far cheaper than one LoadBalancer per service.
Service Type 4: ExternalName
The ExternalName service type creates a DNS alias inside the Kubernetes cluster that resolves to an external DNS name. Unlike other service types, it does not involve any internal pods or endpoints — it is simply a DNS alias that forwards traffic to an external target.
# externalname-service.yaml
apiVersion: v1
kind: Service
metadata:
  name: external-database
  namespace: production
spec:
  type: ExternalName
  externalName: db.mycompany.com    # External hostname — not a Kubernetes resource
kubectl apply -f externalname-service.yaml
kubectl get svc external-database
# NAME TYPE CLUSTER-IP EXTERNAL-IP PORT(S)
# external-database ExternalName <none> db.mycompany.com <none>How it works — DNS only, no proxying:
Pod inside cluster resolves "external-database":
  → CoreDNS returns CNAME: db.mycompany.com
  → DNS resolves db.mycompany.com → 203.45.67.89
  → Pod connects directly to 203.45.67.89

No kube-proxy, no iptables rules, no load balancing involved.
Traffic goes directly to the external service.
Real-world use cases:
# 1. Managed cloud database (RDS, Cloud SQL, Azure Database)
apiVersion: v1
kind: Service
metadata:
  name: postgres-db
  namespace: production
spec:
  type: ExternalName
  externalName: myapp-prod.abc123.us-east-1.rds.amazonaws.com
---
# 2. Legacy service outside Kubernetes
apiVersion: v1
kind: Service
metadata:
  name: legacy-crm
  namespace: production
spec:
  type: ExternalName
  externalName: crm.internal.company.com
---
# 3. Third-party API endpoint
apiVersion: v1
kind: Service
metadata:
  name: payment-gateway
  namespace: production
spec:
  type: ExternalName
  externalName: api.stripe.com
The migration pattern — ExternalName’s killer use case:
# Phase 1: App connects to "database" service → ExternalName → external DB
kind: Service
metadata:
  name: database
spec:
  type: ExternalName
  externalName: old-database.company.com

# Phase 2 (later): Change to ClusterIP → in-cluster DB
# Application code changes nothing — it still connects to "database"
kind: Service
metadata:
  name: database
spec:
  type: ClusterIP
  selector:
    app: postgresql
In case that external service needs to be replaced, it is easier to switch by just modifying the ExternalName, instead of updating all connections in application code.
When to use ExternalName:
- Your app needs to connect to a managed cloud database (RDS, Cloud SQL) without changing connection strings
- Migrating from external services to in-cluster services (or vice versa) — zero app changes required
- Giving Kubernetes-style DNS names to external services so they blend with in-cluster services
- Connecting to APIs outside the cluster where you want a single point of change for the hostname
Important limitation: ExternalName uses CNAME DNS records, which means:
- TLS certificates are validated against the external hostname (
db.mycompany.com), not the alias name (external-database) - No port remapping — the pod must connect on the port the external service actually uses
Headless Service: A Special Case
A headless Service is a ClusterIP Service with clusterIP: None. Instead of load balancing, CoreDNS returns the actual pod IPs directly:
# headless-service.yaml
apiVersion: v1
kind: Service
metadata:
  name: mongodb-headless
  namespace: production
spec:
  clusterIP: None    # This is what makes it headless
  selector:
    app: mongodb
  ports:
    - port: 27017
# Regular ClusterIP — returns single stable IP
nslookup backend-api.production.svc.cluster.local
# Address: 10.96.12.34 (single ClusterIP)
# Headless Service — returns all pod IPs
nslookup mongodb-headless.production.svc.cluster.local
# Address: 10.244.1.5
# Address: 10.244.1.6
# Address: 10.244.2.3
# StatefulSet pods get individual DNS names
nslookup mongodb-0.mongodb-headless.production.svc.cluster.local
# Address: 10.244.1.5 (specific pod IP)When to use Headless Services:
- StatefulSets — every pod needs its own addressable DNS name (see our Deployment vs StatefulSet vs DaemonSet guide)
- Client-side load balancing — the client receives all pod IPs and chooses which to connect to
- Peer discovery in distributed systems (Cassandra, Elasticsearch cluster formation)
Service Types Build on Each Other
The NodePort type is an extension of the ClusterIP type. The LoadBalancer type is an extension of the NodePort type. So a Service of type LoadBalancer has a cluster IP address and one or more nodePort values.
ClusterIP (base):
  - Stable internal IP
  - Load balancing to pods via kube-proxy

NodePort (extends ClusterIP):
  - Everything ClusterIP provides, PLUS
  - Port opened on every node (30000-32767)

LoadBalancer (extends NodePort):
  - Everything NodePort provides, PLUS
  - Cloud-provider load balancer with public IP
This means a LoadBalancer Service is always also accessible via its NodePort, and always has a ClusterIP. When you create a type: LoadBalancer service, you get all three access methods simultaneously.
Side-by-Side Comparison Table
| Feature | ClusterIP | NodePort | LoadBalancer | ExternalName |
|---|---|---|---|---|
| Access scope | Cluster-internal only | External via node IP + port | External via dedicated IP | DNS alias to external |
| External IP | None | None (uses node IPs) | Yes (cloud or MetalLB) | External hostname only |
| Port restriction | Any port | 30000-32767 only | Any port (80, 443, etc.) | No port remapping |
| Load balancing | kube-proxy | kube-proxy | Cloud LB + kube-proxy | None (DNS only) |
| Cloud cost | Free | Free | Paid (per LB) | Free |
| Best for | Internal services | Dev/test, non-HTTP prod | Production HTTP/TCP | External service aliasing |
| On bare metal | ✅ Full support | ✅ Full support | ⚠️ Needs MetalLB | ✅ Full support |
| Default type | ✅ Yes | No | No | No |
| Headless variant | ✅ (clusterIP: None) | No | No | No |
Traffic Flow for Each Service Type
ClusterIP:
Pod (in cluster)
    │ curl http://backend-api:80
    ▼
CoreDNS resolves "backend-api" → 10.96.12.34
    ▼
iptables/IPVS on the source node
    ▼
NAT: 10.96.12.34:80 → pod IP:8080 (one of the healthy pods)
    ▼
Target pod
NodePort:
External client
    │ http://192.168.1.10:30080
    ▼
kube-proxy iptables rule on node 192.168.1.10
    ▼
NAT → ClusterIP → load balance to any pod on any node
    ▼
Target pod (may be on a different node than the entry node)
LoadBalancer:
External client
    │ http://34.123.45.67:80
    ▼
Cloud Load Balancer (health checks nodes, distributes to healthy ones)
    ▼
Node:NodePort (auto-created)
    ▼
kube-proxy → ClusterIP → pod
    ▼
Target pod
ExternalName:
Pod (in cluster)
    │ curl http://external-database:5432
    ▼
CoreDNS returns CNAME: db.mycompany.com
    ▼
DNS resolution: db.mycompany.com → 203.45.67.89
    ▼
Pod connects directly to 203.45.67.89:5432
    (kube-proxy not involved at all)
Real-World Architecture: All Types Working Together
A production e-commerce platform using all Service types:
Internet
  │
  ▼ HTTP/HTTPS (80/443)
LoadBalancer Service (ingress-nginx)
  │ Public IP: 34.123.45.67
  │ Provisioned by MetalLB (bare metal) or cloud provider
  ▼
NGINX Ingress Controller pods
  │ Routes by hostname and path
  ├── app.myshop.com → ClusterIP: frontend Service → frontend pods
  ├── api.myshop.com → ClusterIP: api-gateway Service → api-gateway pods
  └── admin.myshop.com → ClusterIP: admin-ui Service → admin pods

Internal services (ClusterIP only — never exposed externally):
  ├── order-service ClusterIP → order pods
  ├── payment-service ClusterIP → payment pods
  ├── notification-worker ClusterIP → worker pods
  ├── postgresql-headless Service → PostgreSQL StatefulSet pods
  └── redis ClusterIP → Redis pods

External integrations (ExternalName):
  ├── stripe-api ExternalName → api.stripe.com
  ├── sendgrid ExternalName → api.sendgrid.com
  └── legacy-erp ExternalName → erp.internal.company.com

Development access (NodePort):
  └── admin-dashboard NodePort:30443 → admin pods
      (restricted by firewall to office IP range only)
In this architecture:
- One LoadBalancer handles all HTTP/HTTPS traffic (cost-efficient)
- Most services use ClusterIP (internal only, secure by default)
- ExternalName makes external dependencies look like internal services
- NodePort provides direct access to the admin dashboard for the office network
externalTrafficPolicy: Local vs Cluster
This setting affects NodePort and LoadBalancer services and determines how traffic arriving at a node is handled:
spec:
  type: LoadBalancer
  externalTrafficPolicy: Cluster   # Default — may route to pods on other nodes
  # OR
  externalTrafficPolicy: Local     # Only route to pods on the receiving node
Cluster (default):
Traffic arrives at Node 1 (no local pods)
    ↓
kube-proxy forwards to Node 2 (has pods)
    ↓
Extra network hop — pod never sees original client IP (SNAT applied)Local:
Traffic arrives at Node 1 (has a pod)
    ↓
Goes directly to local pod
    ↓
No extra hop — pod sees real client IP

Traffic arrives at Node 1 (NO local pods) → Connection refused
    ↓
Cloud LB only sends to nodes with pods (via health checks)
When to use Local:
- When the application needs the real client IP (for rate limiting, geo-blocking, access logs)
- With a proper cloud load balancer that health-checks which nodes have pods (prevents the “no local pods” case)
When to keep Cluster:
- When node distribution of pods is uneven (traffic would be imbalanced with
Local) - When you don’t need the real client IP
- When you can’t guarantee the cloud LB only sends to nodes with pods
Service Discovery and DNS
Every Service gets a DNS entry automatically from CoreDNS:
Short name (same namespace):
  backend-api → resolves to ClusterIP

Fully Qualified Domain Name (any namespace):
  backend-api.production.svc.cluster.local → resolves to ClusterIP

StatefulSet pod DNS (headless service required):
  mongodb-0.mongodb-headless.production.svc.cluster.local → resolves to Pod-0 IP
  mongodb-1.mongodb-headless.production.svc.cluster.local → resolves to Pod-1 IP
Test DNS resolution inside the cluster:
# Run a DNS debugging pod
kubectl run dns-test --image=busybox:1.36 --rm -it --restart=Never \
  -- nslookup backend-api.production.svc.cluster.local

# Or with more detail
kubectl run dns-test --image=tutum/dnsutils --rm -it --restart=Never \
  -- dig backend-api.production.svc.cluster.local

# Check CoreDNS config
kubectl get configmap coredns -n kube-system -o yaml
Services vs Ingress: When to Use Which
A common confusion: Services expose pods, Ingress routes HTTP traffic to Services. They work at different layers:
| Service | Ingress | |
|---|---|---|
| Layer | L4 (TCP/UDP) | L7 (HTTP/HTTPS) |
| Routing logic | By port only | By hostname + URL path |
| TLS termination | No (unless LoadBalancer handles it) | Yes (via cert-manager) |
| Multiple apps, one IP | No (one LB per service) | Yes (one Ingress, many services) |
| WebSocket | ✅ Native | ✅ With annotation |
| gRPC, TCP, UDP | ✅ Yes | ❌ No (HTTP only) |
Use a Service when:
- You need TCP/UDP routing (non-HTTP protocols)
- Internal pod-to-pod communication (ClusterIP)
- Direct LoadBalancer for a single service that needs its own IP
Use Ingress when:
- Multiple HTTP/HTTPS services need to share one IP (cost-efficient)
- You need hostname-based or path-based routing
- You want automated TLS certificate management via cert-manager
See our Deploy NGINX Ingress Controller guide for the full Ingress setup on top of a LoadBalancer Service.
Common Issues and Quick Fixes
| Symptom | Likely Cause | Fix |
|---|---|---|
Service has no endpoints (kubectl get endpoints shows <none>) | Label selector doesn’t match any pod labels | Compare spec.selector in Service with metadata.labels in pod template |
| ClusterIP unreachable from other pods | Pods in different namespaces using short name | Use FQDN: svc-name.namespace.svc.cluster.local |
| NodePort unreachable from outside | Firewall blocking the NodePort range | Open port range 30000-32767 in firewall/security group |
LoadBalancer EXTERNAL-IP stays <pending> | No cloud provider or MetalLB configured | Install MetalLB (bare metal) or verify cloud provider integration |
| ExternalName returns wrong IP | DNS caching on the pod | ExternalName uses CNAME — check external DNS propagation |
| Pod sees wrong client IP | externalTrafficPolicy: Cluster doing SNAT | Change to externalTrafficPolicy: Local if cloud LB supports it |
| Service routes to terminated pods | Endpoints not updated fast enough | Add readinessProbe to pods — unhealthy pods are removed from endpoints |
Diagnose a broken Service step by step:
# 1. Check the Service exists
kubectl get svc my-service -n my-namespace

# 2. Check endpoints (are any pods selected?)
kubectl get endpoints my-service -n my-namespace
# If empty → label selector problem

# 3. Verify pod labels match service selector
kubectl get pods -n my-namespace --show-labels
kubectl describe svc my-service -n my-namespace | grep Selector

# 4. Test from inside the cluster
kubectl run debug --image=curlimages/curl --rm -it --restart=Never \
  -- curl http://my-service.my-namespace.svc.cluster.local

# 5. Check kube-proxy is running on all nodes
kubectl get pods -n kube-system | grep kube-proxy
Frequently Asked Questions
What is the default Kubernetes Service type?
ClusterIP. When you create a Service without specifying a type, Kubernetes creates a ClusterIP Service — internal access only, no external IP assigned.
Can I change a Service type after creation?
Yes — kubectl edit svc my-service or kubectl patch svc my-service -p '{"spec":{"type":"NodePort"}}'. Changing from ClusterIP to LoadBalancer (or back) triggers provisioning or deprovisioning of the cloud load balancer.
Why does my LoadBalancer Service show <pending> for EXTERNAL-IP?
On cloud clusters (EKS, GKE, AKS), this usually resolves in 1-2 minutes. On bare-metal clusters, it stays <pending> permanently until MetalLB or another load balancer implementation is installed.
What’s the difference between port and targetPort in a Service?port is what the Service listens on (used by clients connecting to the Service). targetPort is the port on the pod that receives the traffic. They can be different — a Service on port 80 can forward to pods listening on port 8080.
Can one Service expose multiple ports?
Yes — add multiple entries to the ports array. When using multiple ports, each entry must have a unique name:
ports:
  - name: http
    port: 80
    targetPort: 8080
  - name: https
    port: 443
    targetPort: 8443
  - name: metrics
    port: 9090
    targetPort: 9090
What happens to traffic if all pods for a Service are down?
The Endpoints list becomes empty. kube-proxy has no pod IPs to forward to, so connections are refused — the Service returns a connection error to the caller. This is why readiness probes are important: a pod that’s starting up but not yet ready is excluded from the Endpoints list, preventing traffic from being sent to it before it’s ready.
Next Steps
With a solid understanding of Kubernetes Service types:
- Set up external access — for HTTP/HTTPS services, combine a LoadBalancer Service for the Ingress Controller with ClusterIP Services for your applications. See our Deploy NGINX Ingress Controller guide.
- Fix the LoadBalancer on bare metal — if
EXTERNAL-IPstays<pending>, see our Install MetalLB on Bare Metal Kubernetes guide for the software load balancer that makestype: LoadBalancerwork without a cloud provider. - Understand workload controllers — Services route traffic to pods, but the type of workload controller (Deployment, StatefulSet, DaemonSet) determines how those pods are managed. See our Kubernetes Deployment vs StatefulSet vs DaemonSet guide for the complete comparison.
- Secure service access — network policies control which pods can send traffic to which Services. Our KubeSphere and Kubernetes Security guide covers network policies alongside the full Kubernetes security hardening checklist.
- Build your cluster — if you don’t have a Kubernetes cluster yet, our Install Kubernetes Cluster on Ubuntu 26.04 LTS guide covers the full kubeadm setup from scratch.
Related posts:
 Install and Configure K3s with NVIDIA GPU Operator on Ubuntu 22.04
 Top 15 Kubernetes Interview Questions and Answers for Beginners (2025)
 What Is KubeKey? Complete Explanation for DevOps Beginners
 How to Install Kubernetes Cluster on Ubuntu 26.04 LTS Using kubeadm (2026 Guide)
 How to Install MetalLB on Bare Metal Kubernetes Cluster (L2 and BGP Guide)
 Kubernetes Deployment vs StatefulSet vs DaemonSet: Complete Comparison with Examples
 How to Back Up and Restore Kubernetes Cluster Using Velero (2026 Guide)
 How to Install Helm on Ubuntu 26.04 LTS (Complete Guide 2026)
