How to Install MetalLB on Bare Metal Kubernetes Cluster (L2 and BGP Guide)

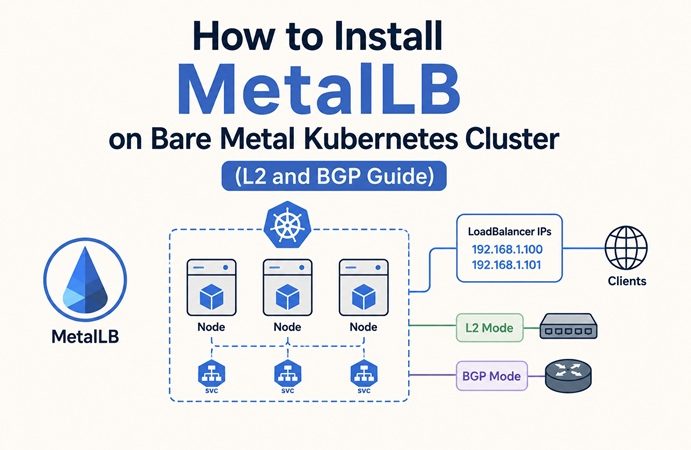
Table of Contents
- The Problem: Why Bare Metal Kubernetes Has No LoadBalancer
- What MetalLB Does
- L2 Mode vs BGP Mode: Which to Choose
- Prerequisites
- Step 1: Prepare the Cluster for MetalLB
- Step 2: Install MetalLB via Helm
- Step 3: Configure an IP Address Pool
- Step 4: Configure Layer 2 Mode (L2)
- Step 5: Verify L2 Mode Works
- Step 6: Configure BGP Mode (Advanced)
- Step 7: Set Up FRR as a BGP Router (Lab Testing)
- Step 8: Integrate with NGINX Ingress Controller
- Step 9: Assign a Specific IP to a Service
- Step 10: Multiple IP Pools for Different Environments
- Monitor MetalLB with Prometheus and Grafana
- MetalLB vs kube-vip: When to Use Which
- Common Issues and Quick Fixes
- Next Steps
Every Kubernetes tutorial eventually tells you to create a Service with type: LoadBalancer. On AWS, GCP, or Azure, this triggers automatic provisioning of an external load balancer — it just works. On a bare metal cluster, the same command produces a service that sits in Pending state indefinitely, with EXTERNAL-IP: <pending> that never resolves. MetalLB fills that gap — it is a load-balancer implementation specifically designed for bare-metal Kubernetes clusters, using standard network protocols.
The Problem: Why Bare Metal Kubernetes Has No LoadBalancer
On cloud providers, creating a Service with type: LoadBalancer automatically provisions a cloud load balancer. On bare metal, that same service just sits in a Pending state forever because there is no cloud provider to create a load balancer for you.
The Kubernetes LoadBalancer service type is intentionally left as a stub for cloud providers to implement. Without a cloud controller manager (the component that talks to AWS, GCP, Azure, etc.), nothing acts on type: LoadBalancer requests — the service controller sets EXTERNAL-IP: <pending> and waits forever.
This affects every bare-metal and on-premise Kubernetes setup: kubeadm clusters, homelab servers, VMs in your own datacenter, and any other environment where there’s no cloud provider running under the cluster.
The workarounds without MetalLB:
- NodePort — works, but stuck on high ports (30000-32767), can’t use 80/443 directly
- HostNetwork — binds to host ports, but no load balancing across nodes
- Manual load balancer — HAProxy or Keepalived in front, but complex and outside Kubernetes
MetalLB integrates directly with Kubernetes, makes type: LoadBalancer work exactly as expected on bare metal, and handles IP address assignment and network advertisement automatically.
What MetalLB Does
MetalLB consists of two components: the Controller — a deployment that watches for LoadBalancer services and assigns IP addresses from configured pools; and the Speaker — a DaemonSet that runs on every node and handles the actual network advertisement of assigned IPs.
When you create a LoadBalancer service:
kubectl expose deployment myapp --type=LoadBalancer --port=80
                    │
                    ▼
MetalLB Controller (Deployment)
  ├── Detects new LoadBalancer service
  ├── Picks an available IP from the configured pool
  └── Assigns it: EXTERNAL-IP = 192.168.1.200
                    │
                    ▼
MetalLB Speaker (DaemonSet — runs on every node)
  ├── L2 mode: responds to ARP requests for 192.168.1.200
  │   → clients on the same LAN reach the service
  └── BGP mode: advertises 192.168.1.200 to upstream routers
      → routers forward traffic to cluster nodes via BGP
From the outside, the service looks like any normal host at 192.168.1.200 — clients don’t know or care that it’s a Kubernetes service.
L2 Mode vs BGP Mode: Which to Choose
L2 Mode is the simplest to set up and works on a local L2 network where clients can reach the service IPs with ARP or NDP. BGP mode provides better load distribution than L2 mode because your router can spread traffic across multiple nodes. However, it requires a BGP-capable router.
| L2 Mode (Layer 2) | BGP Mode | |
|---|---|---|
| How it works | ARP/NDP responses to claim an IP | Advertises routes to upstream BGP routers |
| Load balancing | Single-node (failover, not ECMP) | True multi-node ECMP via BGP |
| Network requirement | Same L2 broadcast domain | BGP-capable router (hardware or FRR/BIRD) |
| Setup complexity | Very simple | Moderate to complex |
| Failover speed | Seconds to minutes (ARP cache) | Sub-second with BFD |
| Cross-subnet | ❌ Same subnet only | ✅ Routable across subnets |
| Best for | Homelab, small office, single rack | Production datacenter, multi-rack |
Choose L2 mode when:
- You’re running a homelab or small on-premise setup
- All clients and cluster nodes are on the same network segment
- You don’t have a BGP-capable router available
- You want the simplest possible setup
Choose BGP mode when:
- You need true multi-node load balancing (not just failover)
- Your cluster spans multiple subnets or racks
- You have network infrastructure with BGP support (Cisco, Juniper, or FRR/BIRD software routers)
- Failover speed matters (use BGP + BFD for sub-second detection)
Prerequisites
- A running Kubernetes cluster on bare metal — see our Install Kubernetes Cluster on Ubuntu 26.04 guide
kubectlconfigured with cluster-admin accesshelmv3+ installed- A free block of IP addresses on your network that MetalLB will own (five to ten is plenty for a lab) — these must not be in use by other hosts and must be on the same subnet as your nodes (for L2 mode)
- Port 7946 (TCP and UDP) open between cluster nodes (required by memberlist for L2 speaker election)
Scan your target IP range before assigning it to MetalLB:
# Check which IPs are already in use on your network
nmap -sn 192.168.1.200-210

# Or ping-sweep manually
for i in $(seq 200 210); do
  ping -c 1 -W 1 192.168.1.$i > /dev/null 2>&1 \
    && echo "192.168.1.$i IN USE" \
    || echo "192.168.1.$i free"
done
Any live host in the range is a conflict — MetalLB will still assign the IP but nothing on the LAN will reach it. Verify the entire range is free before proceeding.
Step 1: Prepare the Cluster for MetalLB
Enable strict ARP mode (required for IPVS proxy mode):
If your cluster uses kube-proxy in IPVS mode, strict ARP must be enabled:
# Check current kube-proxy mode
kubectl get configmap kube-proxy -n kube-system -o yaml | grep mode
If the mode is ipvs, enable strictARP:
kubectl get configmap kube-proxy -n kube-system -o yaml | \
  sed -e "s/strictARP: false/strictARP: true/" | \
  kubectl apply -f - -n kube-system
For kubeadm clusters using the default iptables mode, this step is not required.
Open memberlist port between nodes:
# On every node — allow MetalLB speaker communication
sudo ufw allow 7946/tcp comment "MetalLB memberlist"
sudo ufw allow 7946/udp comment "MetalLB memberlist"
sudo ufw reload
Step 2: Install MetalLB via Helm
# Add MetalLB Helm repository
helm repo add metallb https://metallb.github.io/metallb
helm repo update

# Install MetalLB
helm upgrade --install metallb metallb/metallb \
  --namespace metallb-system \
  --create-namespace \
  --wait
Verify all pods are running:
kubectl get pods -n metallb-system
# NAME                                  READY   STATUS    RESTARTS   AGE
# metallb-controller-xxx                1/1     Running   0          1m
# metallb-speaker-xxx (node 1)          4/4     Running   0          1m
# metallb-speaker-xxx (node 2)          4/4     Running   0          1m
# metallb-speaker-xxx (node 3)          4/4     Running   0          1m
Why 4/4 containers in the speaker pod?MetalLB uses FRR-K8s as the default backend for handling BGP sessions.The speaker pod now runs multiple containers: the MetalLB speaker itself, the FRR-K8s container, the FRR daemon, and a reloader. This is the new default since MetalLB 0.14+ — the speaker showing 4/4 is expected.
Alternative: Install via manifest (without Helm):
# FRR-K8s mode (default, recommended)
kubectl apply -f https://raw.githubusercontent.com/metallb/metallb/v0.16.1/config/manifests/metallb-frr-k8s.yaml

# Native mode (lightweight, L2 only or simple BGP)
kubectl apply -f https://raw.githubusercontent.com/metallb/metallb/v0.16.1/config/manifests/metallb-native.yaml
Step 3: Configure an IP Address Pool
MetalLB version 0.13+ uses CRDs (Custom Resource Definitions) for all configuration — no more ConfigMaps:
# ip-address-pool.yaml
apiVersion: metallb.io/v1beta1
kind: IPAddressPool
metadata:
  name: main-pool
  namespace: metallb-system
spec:
  addresses:
    # Option 1: IP range
    - 192.168.1.200-192.168.1.210

    # Option 2: CIDR block (uncomment to use)
    # - 192.168.1.200/28

  # Prevent MetalLB from assigning .0 and .255 addresses
  avoidBuggyIPs: true

  # Set to false if you want to manually specify IPs per service
  autoAssign: true
kubectl apply -f ip-address-pool.yaml
# Verify pool was created
kubectl get ipaddresspools -n metallb-system
# NAME AUTO ASSIGN AVOID BUGGY IPS ADDRESSES
# main-pool true true ["192.168.1.200-192.168.1.210"]Step 4: Configure Layer 2 Mode (L2)
For L2 mode, create an L2Advertisement resource that links the IP pool to Layer 2 advertisement:
# l2-advertisement.yaml
apiVersion: metallb.io/v1beta1
kind: L2Advertisement
metadata:
  name: main-l2-advertisement
  namespace: metallb-system
spec:
  # Link to the IP pool (omit to advertise all pools)
  ipAddressPools:
    - main-pool

  # Optional: restrict which nodes can be speakers for this pool
  # nodeSelectors:
  #   - matchLabels:
  #       node-role: edge
kubectl apply -f l2-advertisement.yaml
# Verify advertisement was created
kubectl get l2advertisements -n metallb-system
# NAME IPADDRESSPOOLS IPADDRESSPOOL SELECTORS
# main-l2-advertisement ["main-pool"]How L2 mode works under the hood:
Layer 2 mode does not require the IPs to be bound to the network interfaces of your worker nodes. It works by responding to ARP requests on your local network directly, to give the machine’s MAC address to clients.
When a client tries to reach 192.168.1.200, it broadcasts an ARP request: “Who has 192.168.1.200?” The MetalLB speaker on one of the nodes (the “leader” for that IP, elected via memberlist) responds with the node’s MAC address. All traffic for that IP flows through that single leader node — this is the L2 mode limitation. If the leader node fails, MetalLB elects a new leader and sends a gratuitous ARP to update all clients.
Step 5: Verify L2 Mode Works
Create a test service with type: LoadBalancer:
# Deploy a test application
kubectl create deployment nginx-test --image=nginx:alpine

# Expose as LoadBalancer
kubectl expose deployment nginx-test \
  --type=LoadBalancer \
  --port=80

# Watch for IP assignment (should appear within seconds)
kubectl get svc nginx-test -w
# NAME         TYPE           CLUSTER-IP     EXTERNAL-IP     PORT(S)
# nginx-test   LoadBalancer   10.96.x.x      192.168.1.200   80:31234/TCP
EXTERNAL-IP shows 192.168.1.200 — MetalLB assigned the first available IP from the pool.
Test connectivity from a machine on the same network:
curl http://192.168.1.200
# Expected: Nginx welcome page HTML

# Or from another node
curl -I http://192.168.1.200
# Expected: HTTP/1.1 200 OK
Check which node is the current L2 leader for this IP:
kubectl logs -n metallb-system -l component=speaker | grep "leader elected"
# Shows which node won the leader election for the IP
Clean up the test:
kubectl delete deployment nginx-test
kubectl delete svc nginx-test
Step 6: Configure BGP Mode (Advanced)
BGP mode replaces the single-node L2 leader with true multi-node routing. Every node advertises the service IP to upstream routers, which then perform ECMP (Equal-Cost Multi-Path) load balancing across all of them.
# bgp-config.yaml
apiVersion: metallb.io/v1beta1
kind: IPAddressPool
metadata:
  name: bgp-pool
  namespace: metallb-system
spec:
  addresses:
    - 192.168.1.200-192.168.1.210
  avoidBuggyIPs: true
---
# BGP Peer configuration (v1beta2 — v1beta1 is deprecated)
apiVersion: metallb.io/v1beta2
kind: BGPPeer
metadata:
  name: router-primary
  namespace: metallb-system
spec:
  myASN: 64513          # Your cluster's ASN (private range: 64512-65534)
  peerASN: 64512        # Your upstream router's ASN
  peerAddress: 192.168.1.1   # Router IP address
  keepaliveTime: 30s
  holdTime: 90s
---
# BGP Advertisement — link pool to BGP
apiVersion: metallb.io/v1beta1
kind: BGPAdvertisement
metadata:
  name: main-bgp-advertisement
  namespace: metallb-system
spec:
  ipAddressPools:
    - bgp-pool
  # Aggregate routes (advertise /24 instead of per-IP /32)
  # aggregationLength: 24
kubectl apply -f bgp-config.yaml
# Check BGP peer status
kubectl get bgppeers -n metallb-system
# NAME PEER ADDRESS PEER ASN MY ASN AGE
# router-primary 192.168.1.1 64512 64513 1m
# Check speaker logs for BGP session establishment
kubectl logs -n metallb-system -l component=speaker | grep -i bgpAdd BFD for faster failover:
BFD (Bidirectional Forwarding Detection) detects link failures in milliseconds instead of the BGP holdtime (90 seconds by default):
# bfd-profile.yaml
apiVersion: metallb.io/v1beta1
kind: BFDProfile
metadata:
  name: fast-failover
  namespace: metallb-system
spec:
  receiveInterval: 300ms
  transmitInterval: 300ms
  detectMultiplier: 3       # Fail after 3 missed intervals (900ms)
---
apiVersion: metallb.io/v1beta2
kind: BGPPeer
metadata:
  name: router-primary
  namespace: metallb-system
spec:
  myASN: 64513
  peerASN: 64512
  peerAddress: 192.168.1.1
  keepaliveTime: 30s
  holdTime: 90s
  bfdProfile: fast-failover   # Enable BFD on this peer
Step 7: Set Up FRR as a BGP Router (Lab Testing)
For testing BGP mode without a physical router, run FRR on a Linux VM or the same network:
# On a separate Ubuntu machine (not a cluster node)
sudo apt install -y frr

# Enable BGP daemon
sudo sed -i 's/bgpd=no/bgpd=yes/' /etc/frr/daemons
sudo systemctl restart frr
Configure FRR to peer with MetalLB:
sudo vtyshconfigure terminal
router bgp 64512
bgp router-id 192.168.1.1
bgp log-neighbor-changes
no bgp ebgp-requires-policy
! Accept peering from all Kubernetes nodes
neighbor 192.168.1.10 remote-as 64513
neighbor 192.168.1.10 description "k8s-master"
neighbor 192.168.1.11 remote-as 64513
neighbor 192.168.1.11 description "k8s-worker-1"
neighbor 192.168.1.12 remote-as 64513
neighbor 192.168.1.12 description "k8s-worker-2"
address-family ipv4 unicast
neighbor 192.168.1.10 activate
neighbor 192.168.1.11 activate
neighbor 192.168.1.12 activate
neighbor 192.168.1.10 route-map ALLOW-ALL in
neighbor 192.168.1.11 route-map ALLOW-ALL in
neighbor 192.168.1.12 route-map ALLOW-ALL in
exit-address-family
route-map ALLOW-ALL permit 10
end
writeVerify BGP sessions from the FRR side:
sudo vtysh -c "show bgp summary"
# Neighbor         V    AS MsgRcvd MsgSent   Up/Down  State/PfxRcd
# 192.168.1.10     4 64513      10      10 00:01:30       1
# 192.168.1.11     4 64513       8       8 00:01:20       1
# 192.168.1.12     4 64513       7       7 00:01:15       1

# View advertised routes from MetalLB
sudo vtysh -c "show ip bgp"
Step 8: Integrate with NGINX Ingress Controller
The most common MetalLB use case: give the NGINX Ingress Controller a real external IP so it can receive traffic on ports 80 and 443.
If NGINX Ingress is already installed and showing <pending>, MetalLB assigns it an IP automatically once configured:
kubectl get svc -n ingress-nginx
# Before MetalLB:
# NAME                         TYPE           CLUSTER-IP   EXTERNAL-IP   PORT(S)
# ingress-nginx-controller     LoadBalancer   10.96.x.x    <pending>     80:xxx,443:xxx

# After MetalLB L2/BGP is configured:
# NAME                         TYPE           CLUSTER-IP   EXTERNAL-IP     PORT(S)
# ingress-nginx-controller     LoadBalancer   10.96.x.x    192.168.1.200   80:xxx,443:xxx
No changes needed to the Ingress Controller — MetalLB watches all LoadBalancer services in the cluster and assigns IPs automatically.
For more details on the complete NGINX Ingress + MetalLB + TLS setup, see our Deploy NGINX Ingress Controller on Kubernetes guide — Step 4 of that guide covers this exact integration.
Step 9: Assign a Specific IP to a Service
By default, MetalLB picks the next available IP from the pool. To request a specific IP:
# specific-ip-service.yaml
apiVersion: v1
kind: Service
metadata:
  name: my-api
  annotations:
    # Request a specific IP from the pool
    metallb.universe.tf/loadBalancerIPs: 192.168.1.205
spec:
  type: LoadBalancer
  selector:
    app: my-api
  ports:
    - port: 80
      targetPort: 8080
kubectl apply -f specific-ip-service.yaml
kubectl get svc my-api
# EXTERNAL-IP should show 192.168.1.205 specificallyThis is useful when you want DNS records to point to a stable, predictable IP rather than whatever MetalLB happens to assign next.
Step 10: Multiple IP Pools for Different Environments
You can define multiple pools and direct services to a specific pool:
# multi-pool-config.yaml
apiVersion: metallb.io/v1beta1
kind: IPAddressPool
metadata:
  name: production-pool
  namespace: metallb-system
  labels:
    env: production
spec:
  addresses:
    - 192.168.1.200-192.168.1.209
  autoAssign: false    # Only assign when explicitly requested
---
apiVersion: metallb.io/v1beta1
kind: IPAddressPool
metadata:
  name: staging-pool
  namespace: metallb-system
  labels:
    env: staging
spec:
  addresses:
    - 192.168.1.210-192.168.1.219
  autoAssign: true     # Assign automatically to any LoadBalancer service
---
apiVersion: metallb.io/v1beta1
kind: L2Advertisement
metadata:
  name: production-l2
  namespace: metallb-system
spec:
  ipAddressPools:
    - production-pool
---
apiVersion: metallb.io/v1beta1
kind: L2Advertisement
metadata:
  name: staging-l2
  namespace: metallb-system
spec:
  ipAddressPools:
    - staging-pool
Request an IP from a specific pool:
apiVersion: v1
kind: Service
metadata:
  name: production-api
  annotations:
    metallb.universe.tf/address-pool: production-pool   # Use production pool
spec:
  type: LoadBalancer
  ...
Monitor MetalLB with Prometheus and Grafana
MetalLB exposes Prometheus metrics from both the controller and speaker pods. If you have the Prometheus + Grafana monitoring stack running, add MetalLB as a scrape target:
# Add to prometheus.yml scrape_configs
- job_name: 'metallb-controller'
  static_configs:
    - targets: ['metallb-controller.metallb-system.svc.cluster.local:7472']

- job_name: 'metallb-speaker'
  kubernetes_sd_configs:
    - role: pod
      namespaces:
        names: [metallb-system]
  relabel_configs:
    - source_labels: [__meta_kubernetes_pod_label_component]
      action: keep
      regex: speaker
    - source_labels: [__meta_kubernetes_pod_ip]
      target_label: __address__
      replacement: '${1}:7472'
Key MetalLB metrics to monitor:
| Metric | Description |
|---|---|
metallb_allocator_addresses_in_use_total | Number of IPs currently allocated |
metallb_allocator_addresses_total | Total IPs in the pool |
metallb_bgp_session_up | BGP session status (1=up, 0=down) |
metallb_bgp_announced_prefixes_total | Number of routes advertised |
metallb_speaker_announced | Whether this node is the L2 leader for a given IP |
Alert when the IP pool is nearly exhausted:
# In Prometheus alert rules
- alert: MetalLBPoolExhausted
  expr: >
    metallb_allocator_addresses_in_use_total /
    metallb_allocator_addresses_total > 0.8
  for: 5m
  labels:
    severity: warning
  annotations:
    summary: "MetalLB IP pool is 80%+ allocated"
    description: "Add more IPs to the pool before services start failing."
Import Grafana Dashboard ID 14127 for a pre-built MetalLB overview — IP allocation, BGP session health, and L2 leader distribution.
MetalLB vs kube-vip: When to Use Which
Both solve the bare-metal LoadBalancer problem, but with different approaches:
| MetalLB | kube-vip | |
|---|---|---|
| Primary purpose | LoadBalancer services | Control plane HA + LoadBalancer services |
| L2 support | ✅ ARP/NDP | ✅ ARP/NDP |
| BGP support | ✅ Full BGP (FRR-K8s) | ✅ Basic BGP |
| Control plane VIP | ❌ Services only | ✅ Yes (main use case) |
| Installation | Helm / manifest | DaemonSet / static pod |
| Configuration | CRDs (IPAddressPool, L2Advertisement, BGPPeer) | Single config file |
| Maturity | High (2017) | Growing (2021) |
| Best for | Services LoadBalancer, complex BGP topologies | Control plane HA + simple LoadBalancer needs |
Use MetalLB when: you need LoadBalancer services for production workloads, complex BGP peering with multiple routers, or multiple IP pools for different environments.
Use kube-vip when: you primarily need a highly available control plane VIP (the main reason to choose kube-vip over MetalLB) — it handles both control plane HA and LoadBalancer services in one tool.
Many production bare-metal clusters run both: kube-vip for control plane HA (floating VIP for the API server), and MetalLB for LoadBalancer services.
Common Issues and Quick Fixes
| Symptom | Likely Cause | Fix |
|---|---|---|
Service still shows <pending> after MetalLB install | No IPAddressPool or L2Advertisement configured | Apply both CRDs — pool alone is not enough |
| IP assigned but unreachable from network | IP range conflicts with existing hosts | Run nmap to find conflicts; choose a free range |
| L2 mode: IP reachable from nodes but not external clients | ARP response not reaching external clients | Verify all nodes and clients are on the same L2 segment |
Speaker pods show 1/1 instead of 4/4 | Native mode installed, not FRR-K8s | Native mode has single container — expected for native mode |
| BGP session not establishing | ASN mismatch or router not accepting peering | Verify myASN/peerASN match router config; check router accepts the peer IP |
BGPPeer v1beta1 is deprecated warning | Using old API version | Update BGPPeer manifest to use v1beta2 |
| IP pool exhausted, new services pending | Not enough IPs in the pool | Add more IP ranges to the IPAddressPool |
| Strict ARP error in speaker logs | kube-proxy IPVS mode without strict ARP | Enable strictARP in kube-proxy ConfigMap |
Next Steps
With MetalLB running on your bare metal cluster:
- Add NGINX Ingress Controller — a single MetalLB LoadBalancer IP shared by all services through host-based routing. See our Deploy NGINX Ingress Controller on Kubernetes guide for the complete setup — Step 4 covers the MetalLB integration specifically.
- Secure the cluster — now that services are reachable from the network, apply network policies to control which pods can receive traffic. Our KubeSphere and Kubernetes Security guide covers network policies alongside RBAC and Pod Security Standards.
- Monitor MetalLB — add MetalLB metrics to your Prometheus + Grafana stack and alert when the IP pool approaches exhaustion.
- Scale to BGP — if your infrastructure grows to multiple racks or subnets, migrate from L2 mode to BGP mode for true ECMP load balancing across all nodes. Start with FRR on a Linux VM as a BGP peer before committing to hardware router configuration.
Related posts:
 How to Install Kubernetes Cluster on Ubuntu 26.04 LTS Using kubeadm (2026 Guide)
 KubeSphere and Kubernetes Security: Complete Hardening Guide for 2026
 How to Install Kubernetes Dashboard on Ubuntu 26.04 with Secure Access
 Install and Configure K3s with NVIDIA GPU Operator on Ubuntu 22.04
 Top 15 Kubernetes Interview Questions and Answers for Beginners (2025)
How to Install Kubernetes (K8s) on Ubuntu 24.04: A Step-by-Step Guide
Top 15 Kubernetes Interview Questions and Answers for Beginners (2025)
How to Install Kubernetes (K8s) on Ubuntu 24.04: A Step-by-Step Guide
 What Is KubeKey? Complete Explanation for DevOps Beginners
 How to Deploy NGINX Ingress Controller on Kubernetes Step-by-Step (2026 Guide)
