Kubernetes Network Policies Explained: Secure Pod-to-Pod Communication (2026 Guide)

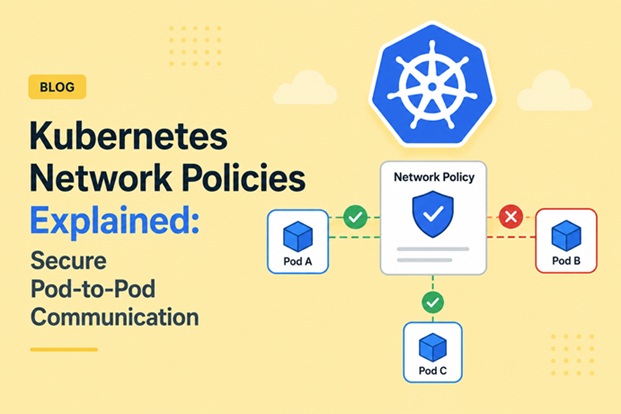
By default, a Kubernetes cluster is a flat network. Any pod can reach any other pod, on any port, in any namespace — a frontend pod can talk directly to a database pod, a compromised sidecar in one namespace can probe every service in another, and a single vulnerable container can become a launchpad for lateral movement across the entire cluster. Network Policies are the native Kubernetes mechanism to close that gap, and understanding them properly is one of the highest-leverage security skills for anyone operating a multi-tenant or production cluster.
This guide explains how Network Policies actually work under the hood, why they depend entirely on your CNI plugin, and walks through building a real default-deny, least-privilege network model — from a single namespace lockdown to full cluster-wide segmentation.
Table of Contents
- Why Kubernetes Networking Is Flat by Default
- What a Network Policy Actually Controls
- CNI Requirements — The Part Everyone Forgets
- Architecture Overview
- Prerequisites
- Step 1 — Verify Your CNI Supports Network Policies
- Step 2 — Deploy a Default-Deny Policy
- Step 3 — Allow Specific Ingress Traffic
- Step 4 — Allow Specific Egress Traffic
- Step 5 — Namespace Isolation
- Step 6 — Allow DNS Resolution
- Step 7 — Verify Policy Enforcement
- Comparing CNI Plugins for Network Policy Support
- Common Network Policy Patterns
- Network Policies vs Service Mesh
- Monitoring and Auditing Policy Behavior
- Security Best Practices
- Performance Considerations
- Troubleshooting Guide
- Conclusion
- FAQ
Why Kubernetes Networking Is Flat by Default
Kubernetes was designed around the principle that every pod gets its own IP address and can, in principle, reach every other pod’s IP address directly — no NAT, no port mapping, no manual routing rules. This model, defined by the Kubernetes networking requirements, makes service discovery and load balancing simple, but it comes with an implicit security trade-off: connectivity is the default state, not isolation.
That means immediately after kubectl apply-ing a fresh application stack, a pod in the dev namespace can open a raw TCP connection to a pod in the payments namespace unless something explicitly stops it. For a single-tenant hobby cluster this rarely matters. For any cluster running multiple teams, multiple trust levels, or handling sensitive data, it is a real attack surface — and it is one that is entirely invisible until someone tests it.
Network Policies exist to invert that default: instead of “allow everything unless denied,” a properly configured cluster enforces “deny everything unless explicitly allowed.”
What a Network Policy Actually Controls
A NetworkPolicy object is a Kubernetes-native resource that selects a group of pods (via label selectors) and defines rules for:
- Ingress — which sources are allowed to send traffic to the selected pods, and on which ports.
- Egress — which destinations the selected pods are allowed to send traffic to, and on which ports.
Critically, Network Policies are additive and pod-scoped, not global firewall rules. A pod with no Network Policy selecting it remains fully open. The moment any policy selects that pod for a given direction (ingress or egress), that direction becomes default-deny for that pod, and only traffic matching an explicit rule is allowed. Multiple policies selecting the same pod are combined with an OR — traffic is allowed if it matches any applicable policy.
CNI Requirements — The Part Everyone Forgets
This is the single most common source of confusion: the Kubernetes API server will happily accept and store a NetworkPolicy object even if nothing in the cluster actually enforces it.
Network Policy enforcement is implemented by the CNI (Container Network Interface) plugin, not by kube-apiserver or kube-controller-manager. If your cluster runs a CNI without policy support — the most common trap being a default flannel installation — every NetworkPolicy you apply is silently ignored, and traffic keeps flowing exactly as before. There is no warning, no error, no event. The policy simply does nothing.
Before writing a single policy, confirm your CNI actually enforces them. This is covered concretely in Step 1 below.
Architecture Overview
The target architecture this guide builds — a three-tier application with default-deny isolation — looks like this:
                        ┌───────────────────────────────────────────────┐
                        │              Namespace: production              │
                        │                                                   │
   Internet ──▶ Ingress │   ┌───────────┐  allow   ┌───────────┐          │
   Controller ──────────┼──▶│ frontend  │─────────▶│  backend   │          │
                        │   │  pods     │  :8080    │   pods     │          │
                        │   └───────────┘           └─────┬─────┘          │
                        │                                    │ allow :5432  │
                        │                          ┌─────────▼─────────┐   │
                        │                          │   postgres pod     │   │
                        │                          │  (default-deny,    │   │
                        │                          │   only backend     │   │
                        │                          │   may connect)     │   │
                        │                          └────────────────────┘   │
                        │                                                   │
                        │   All other pod-to-pod traffic: DENIED by         │
                        │   default-deny-all NetworkPolicy                  │
                        └───────────────────────────────────────────────┘
                                          │
                                          │ DNS (kube-dns/CoreDNS) explicitly allowed
                                          ▼
                              ┌────────────────────┐
                              │ kube-system namespace │
                              └────────────────────┘
Each tier can only reach the tier immediately below it, on the specific port it needs, and nothing else — including no direct frontend-to-database access, even though nothing in Kubernetes prevents that connection by default.
Prerequisites
- A Kubernetes cluster (v1.28+) running a CNI plugin with Network Policy support — Calico, Cilium, or Weave Net are the most common choices. (Managed clusters: enable it explicitly — EKS requires the Calico add-on or Cilium; GKE requires enabling “Network Policy” at cluster creation; AKS supports both Azure and Calico network policy engines.)
kubectlaccess with permission to createNetworkPolicyresources.- A sample multi-tier application (frontend, backend, database) to test policies against — or reuse the PostgreSQL StatefulSet from bckinfo.com’s PostgreSQL on Kubernetes deployment guide as the database tier.
Step 1 — Verify Your CNI Supports Network Policies
kubectl get pods -n kube-system -o wideLook for a Calico (calico-node), Cilium (cilium), or Weave Net (weave-net) DaemonSet running on every node. If you only see kube-proxy and a CNI plugin known not to enforce policies (plain flannel is the classic case), install a policy-capable CNI or layer Calico on top of flannel using Canal before continuing — otherwise every step below will apply cleanly but change nothing.
A quick functional test: apply a strict default-deny policy (Step 2) and confirm that traffic actually gets blocked. If it doesn’t, the CNI is the problem, not the YAML.
Step 2 — Deploy a Default-Deny Policy
Start every namespace with a deny-all baseline, then add exceptions. This inverts the insecure default and is the single most impactful change in this guide.
# default-deny-all.yaml
apiVersion: networking.k8s.io/v1
kind: NetworkPolicy
metadata:
  name: default-deny-all
  namespace: production
spec:
  podSelector: {}
  policyTypes:
    - Ingress
    - Egress
kubectl apply -f default-deny-all.yamlAn empty podSelector: {} matches every pod in the namespace. With both Ingress and Egress listed under policyTypes and no rules defined, this blocks all inbound and outbound traffic for every pod in production — including traffic to DNS, which must be explicitly re-allowed in Step 6.
Step 3 — Allow Specific Ingress Traffic
Allow the backend pods to receive traffic only from frontend pods on port 8080:
# allow-frontend-to-backend.yaml
apiVersion: networking.k8s.io/v1
kind: NetworkPolicy
metadata:
  name: allow-frontend-to-backend
  namespace: production
spec:
  podSelector:
    matchLabels:
      app: backend
  policyTypes:
    - Ingress
  ingress:
    - from:
        - podSelector:
            matchLabels:
              app: frontend
      ports:
        - protocol: TCP
          port: 8080
kubectl apply -f allow-frontend-to-backend.yamlThe podSelector under spec chooses which pods this policy applies to (the destination); the podSelector nested under from chooses which pods are allowed to initiate traffic (the source). Mixing these two up is one of the most common Network Policy authoring mistakes.
Step 4 — Allow Specific Egress Traffic
Allow backend pods to reach the postgres pod on port 5432, and nothing else outbound:
# allow-backend-to-postgres.yaml
apiVersion: networking.k8s.io/v1
kind: NetworkPolicy
metadata:
  name: allow-backend-to-postgres
  namespace: production
spec:
  podSelector:
    matchLabels:
      app: backend
  policyTypes:
    - Egress
  egress:
    - to:
        - podSelector:
            matchLabels:
              app: postgres
      ports:
        - protocol: TCP
          port: 5432
kubectl apply -f allow-backend-to-postgres.yamlCombined with Step 2’s default deny, backend pods can now only send traffic to postgres on 5432 and receive traffic from frontend on 8080 — every other path is closed.
Step 5 — Namespace Isolation
To restrict traffic based on which namespace it comes from — useful for multi-tenant clusters — combine namespaceSelector with podSelector. First, label the namespace:
kubectl label namespace production environment=prodThen reference it:
# allow-from-prod-namespace-only.yaml
apiVersion: networking.k8s.io/v1
kind: NetworkPolicy
metadata:
  name: allow-from-prod-namespace-only
  namespace: production
spec:
  podSelector:
    matchLabels:
      app: backend
  policyTypes:
    - Ingress
  ingress:
    - from:
        - namespaceSelector:
            matchLabels:
              environment: prod
          podSelector:
            matchLabels:
              app: frontend
When both namespaceSelector and podSelector are listed together under the same from entry, Kubernetes requires both to match — the source pod must have the app: frontend label and live in a namespace labeled environment: prod. Listing them as separate entries in the from list, by contrast, would mean either condition matching is sufficient — a subtle but important distinction.
Step 6 — Allow DNS Resolution
This step is skipped constantly and causes the most confusing “everything is broken” support tickets. Under a default-deny egress policy, pods can no longer resolve DNS, because DNS queries to CoreDNS in kube-system are themselves blocked.
# allow-dns.yaml
apiVersion: networking.k8s.io/v1
kind: NetworkPolicy
metadata:
  name: allow-dns
  namespace: production
spec:
  podSelector: {}
  policyTypes:
    - Egress
  egress:
    - to:
        - namespaceSelector: {}
      ports:
        - protocol: UDP
          port: 53
        - protocol: TCP
          port: 53
kubectl apply -f allow-dns.yamlApplying this immediately after Step 2, before testing anything else, avoids hours of debugging pods that appear to hang on every outbound connection.
Step 7 — Verify Policy Enforcement
Test from inside a pod that should be blocked:
kubectl run test-pod --rm -it --image=busybox -n production -- \
  wget -qO- --timeout=3 http://postgres-svc:5432
This should time out if test-pod has no label granting it access. Then confirm the allowed path still works:
kubectl exec -it <backend-pod-name> -n production -- \
  nc -zv postgres-svc 5432
kubectl describe networkpolicy -n productionThe describe output lists exactly which pods each policy selects and which rules apply — the fastest way to sanity-check a policy set without guessing from raw YAML.
Comparing CNI Plugins for Network Policy Support
| CNI Plugin | Policy Enforcement | Layer 7 Rules | Performance Overhead | Best For |
|---|---|---|---|---|
| Flannel (default) | None | No | N/A | Simple clusters with no isolation needs |
| Calico | Full (native + extended CRDs) | Limited (via Calico Enterprise) | Low | General-purpose production clusters |
| Cilium | Full (eBPF-based) | Yes (HTTP, gRPC, Kafka-aware) | Very low (eBPF) | High-performance, security-focused clusters |
| Weave Net | Full (basic K8s NetworkPolicy) | No | Moderate | Simple production clusters wanting policy support without extra CRDs |
| Azure CNI + Azure NPM | Full | No | Low | AKS clusters staying within Azure-native tooling |
Cilium’s eBPF-based enforcement generally has the lowest per-packet overhead and adds Layer 7-aware policies (e.g., “allow only HTTP GET requests to /api/v1/health“) beyond what the base Kubernetes NetworkPolicy API supports — though that extra capability requires Cilium-specific CiliumNetworkPolicy CRDs rather than the portable native API.
Common Network Policy Patterns
- Deny-all baseline per namespace — always the first policy applied, as shown in Step 2.
- Allow DNS — always the second policy applied, as shown in Step 6.
- Tier-to-tier allow rules — frontend → backend → database, each restricted to the specific port needed.
- Deny egress to the internet — for pods that should never make outbound calls (e.g., a database pod), omit any egress rule beyond DNS and intra-cluster traffic.
- Allow monitoring scrape traffic — a dedicated policy allowing ingress from the
monitoringnamespace on the metrics port, so Prometheus can scrape pods without opening them to everything else. - Egress allow-list to external APIs — using
ipBlockCIDR ranges instead ofpodSelectorwhen a pod must reach a specific external service.
Network Policies vs Service Mesh
A frequent point of confusion: Network Policies and a service mesh (Istio, Linkerd, Cilium Service Mesh) solve related but distinct problems.
| Aspect | Network Policy | Service Mesh |
|---|---|---|
| OSI Layer | Layer 3/4 (IP, port) | Layer 7 (HTTP, gRPC paths, headers) |
| Encryption | Not provided | mTLS between pods, typically automatic |
| Traffic shaping | No | Yes (retries, timeouts, circuit breaking, canary routing) |
| Enforcement point | CNI plugin (kernel/eBPF level) | Sidecar proxy or eBPF datapath |
| Operational cost | Low | Higher — sidecars, control plane, more moving parts |
They are complementary, not competing: Network Policies decide whether a connection is allowed to exist at all, while a service mesh decides what happens within an allowed connection. Many production clusters run both — Network Policies as the coarse-grained network boundary, and a service mesh for encryption and fine-grained traffic control within that boundary.
Monitoring and Auditing Policy Behavior
- Cilium Hubble provides real-time flow visibility, showing exactly which connections are allowed or dropped by policy, per pod, in a live UI.
- Calico’s
calicoctlexposes policy hit counters and can run in “audit mode,” logging what would be dropped before switching a policy to enforcing mode — a safer rollout path for tightening an existing cluster. - Combine policy audit logs with the monitoring stack described in bckinfo.com’s Prometheus and Grafana setup guide to alert when a pod suddenly starts generating a spike in denied connections, which often signals either a misconfiguration or a compromised container probing the network.
Security Best Practices
- Apply a
default-deny-allpolicy to every namespace as a baseline, not just the sensitive ones — attackers look for the namespace someone forgot. - Never rely on
podSelector: {}with nopolicyTypesrestriction thinking it denies traffic; an empty policy with nopolicyTypeslisted has no effect at all. - Label pods and namespaces consistently and deliberately — Network Policies are only as precise as the labels they select on.
- Combine Network Policies with Kubernetes RBAC and Pod Security Standards; policies control network reachability, not what a pod is authorized to do once connected.
- Test policies in a staging namespace with mirrored labels before rolling them out to production — an overly strict policy silently breaks functionality rather than throwing a visible error.
- Periodically audit for pods with no policy selecting them at all — these remain fully open even in an otherwise locked-down cluster.
Performance Considerations
Native NetworkPolicy enforcement via iptables (used by some CNI implementations) can add measurable per-packet overhead as the number of rules grows into the hundreds, particularly under high connection-churn workloads. eBPF-based CNIs like Cilium avoid most of this cost by evaluating policy in the kernel data path without traversing long iptables chains, making them the better choice for large clusters with dense policy sets. For most mid-sized clusters, however, the security benefit of default-deny substantially outweighs the marginal latency cost regardless of CNI choice.
Troubleshooting Guide
| Symptom | Likely Cause | Fix |
|---|---|---|
| Policy applied but traffic still flows freely | CNI does not enforce Network Policies (e.g., plain flannel) | Install or switch to a policy-capable CNI (Calico, Cilium, Weave Net) |
| All outbound traffic suddenly hangs after default-deny | DNS not explicitly allowed | Apply the allow-dns policy from Step 6 |
| Pod can’t reach a service even though a policy allows it | podSelector labels don’t actually match the pod’s labels | Run kubectl get pods --show-labels and compare against the policy’s selector |
| Two policies conflict / unclear which rule wins | Misunderstanding — policies are additive (OR’d), never subtractive | Remember: any matching policy grants access; there is no explicit “deny” rule type in the native API |
namespaceSelector isolation not working | Namespace missing the expected label | Confirm with kubectl get ns --show-labels; labels must be applied manually |
| Monitoring/Prometheus can’t scrape pods after lockdown | No ingress rule allowing the monitoring namespace on the metrics port | Add an explicit ingress rule for the scrape port, sourced from the monitoring namespace |
| Policy YAML applies with no error but does nothing | policyTypes omitted, so Kubernetes infers it from ingress/egress fields present — can silently produce unintended scope | Always explicitly list policyTypes: [Ingress, Egress] even when only one direction has rules |
Conclusion
Kubernetes’ flat-network default is convenient for getting a cluster running quickly, but it is not a security posture — it is the absence of one. Network Policies turn that implicit “allow everything” into an explicit, auditable, least-privilege model, and the pattern to get there is consistent regardless of cluster size: confirm your CNI actually enforces policies, apply a default-deny baseline per namespace, immediately re-allow DNS, then add narrow, purpose-specific ingress and egress rules tier by tier.
Treat Network Policies as a mandatory layer alongside RBAC and Pod Security Standards, not an optional hardening step reserved for “later.” The earlier default-deny is established in a namespace’s lifecycle, the fewer legacy “temporarily allow everything” exceptions accumulate — and those exceptions are exactly what attackers rely on.
For related reading on bckinfo.com, see the guides on deploying PostgreSQL on Kubernetes with persistent storage, Docker network security best practices, and Prometheus and Grafana monitoring stack setup for observing policy behavior in production.
FAQ
Do Network Policies work on every Kubernetes cluster?
No. Network Policies are enforced by the cluster’s CNI plugin, not the Kubernetes API server. A cluster running a CNI without policy support — the default flannel configuration being the most common case — will accept NetworkPolicy objects but silently ignore them.
What happens if no Network Policy is applied to a pod?
By default, all traffic between all pods is allowed. A pod becomes restricted only once at least one Network Policy selects it for a given direction (ingress or egress); at that point, only explicitly allowed traffic in that direction passes.
Is a Network Policy the same as a service mesh?
No. Network Policies operate at Layer 3/4, controlling which pods can reach which pods over IP and port. A service mesh like Istio or Linkerd operates at Layer 7, adding mutual TLS, retries, and fine-grained request routing on top of the connectivity Network Policies allow.
Can I use Network Policies to restrict traffic to external IP addresses?
Yes, using ipBlock with a CIDR range instead of a podSelector in the to/from field, though except sub-ranges and dynamic external IPs require careful maintenance as those addresses change.
Which CNI should I choose specifically for Network Policy support?
Calico is the most widely adopted, well-documented choice for standard Kubernetes-native policies. Cilium is the better choice when you also want eBPF-level performance and optional Layer 7-aware policies via its extended CRDs.
Related posts:
 How to Back Up and Restore Kubernetes Cluster Using Velero (2026 Guide)
 How to Deploy Jenkins on Kubernetes
 Kubernetes Troubleshooting: 50 kubectl Commands Every Administrator Should Know
 How to Run Redis on Kubernetes Using StatefulSet
 How to Deploy PostgreSQL on Kubernetes with Persistent Storage (2026 Guide)
 Run Redis in Docker: Complete Setup Guide 2026
 Docker Container Security Best Practices: A Comprehensive Guide
 Kubernetes Deployment vs StatefulSet vs DaemonSet: Complete Comparison with Examples
