Longhorn Persistent Storage on Rocky Linux 10 Kubernetes

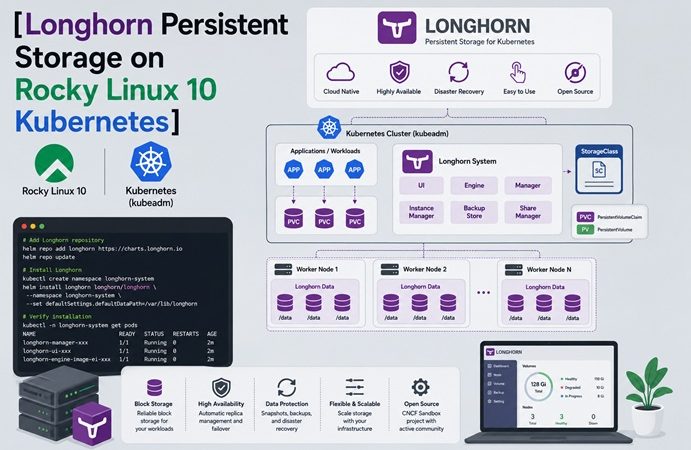
Your Rocky Linux 10 kubeadm cluster can now run workloads (Docker install guide, kubeadm cluster setup) and route traffic into them (NGINX Ingress guide). The missing piece is persistent storage — without it, any Pod holding state (databases, file uploads, queues) loses its data the moment it’s rescheduled.
This guide deploys Longhorn, Rancher’s distributed block storage system, on that same cluster — covering the iSCSI dependency, firewalld ports, and SELinux context that Rocky Linux requires but most Longhorn tutorials skip.
Table of Contents
- Why Longhorn
- Prerequisites
- Longhorn vs Other Kubernetes Storage Options
- Architecture Overview
- Step 1: Install open-iscsi on Every Node
- Step 2: Open Required firewalld Ports
- Step 3: Prepare a Dedicated Storage Disk
- Step 4: Install Longhorn via Helm
- Step 5: Set Longhorn as the Default StorageClass
- Step 6: Test with a Stateful Sample App
- Troubleshooting Table
- FAQ
- Conclusion
Why Longhorn
- Cloud-native block storage that runs entirely inside the cluster — no external SAN/NAS required
- Built-in volume replication (default: 3 replicas) across nodes for resilience
- Snapshot and backup support (to S3-compatible targets) out of the box
- A web UI for volume management, separate from
kubectl
Prerequisites
- Working kubeadm cluster on Rocky Linux 10 (control plane + at least 2 workers recommended, since Longhorn replicates across nodes)
kubectlandhelmv3 configured against the cluster- At least one unformatted disk or free partition per node dedicated to Longhorn (don’t point it at the root filesystem in production)
Longhorn vs Other Kubernetes Storage Options
| Option | Type | Setup Complexity | Best Fit |
|---|---|---|---|
| Longhorn | Distributed block storage (in-cluster) | Moderate | Bare-metal/homelab clusters needing replicated PVs without external hardware |
| local-path-provisioner | Local, single-node only | Very low | Dev/test only — no replication, data lost if the node dies |
| NFS (external) | Network file storage | Low–moderate | Environments that already run an NFS server |
| Ceph (Rook) | Distributed, multi-protocol | High | Larger clusters needing block + object + file storage together |
| Cloud provider CSI (EBS, PD, etc.) | Cloud-managed | Low (on that cloud) | Managed cloud clusters — not applicable to bare-metal Rocky Linux |
For a bare-metal Rocky Linux cluster without an existing SAN/NFS server, Longhorn hits the sweet spot between Ceph’s complexity and local-path’s lack of resilience.
Architecture Overview
        ┌──────────────────────┐   ┌──────────────────────┐   ┌───────────────────────┐
        │       Node 1         │   │       Node 2         │   │       Node 3          │
        │ ┌──────────────────┐ │   │ ┌──────────────────┐ │   │ ┌───────────────────┐ │
        │ │ Longhorn Engine  │ │   │ │ Longhorn Engine  │ │   │ │ Longhorn Engine   │ │
        │ │ + Replica        │◀┼───┼▶│ + Replica       │◀┼──┼▶│ + Replica         │ │
        │ └─────────┬────────┘ │   │ └─────────┬────────┘ │   │ └─────────┬─────────┘ │
        │ ┌─────────▼────────┐ │   │ ┌─────────▼────────┐ │   │ ┌─────────▼─────────┐ │
        │ │ Dedicated disk   │ │   │ │ Dedicated disk   │ │   │ │ Dedicated disk    │ │
        │ │/var/lib/longhorn │ │   │ │ /var/lib/longhorn│ │   │ │ /var/lib/longhorn │ │
        │ └──────────────────┘ │   │ └──────────────────┘ │   │ └───────────────────┘ │
        └──────────────────────┘   └──────────────────────┘   └───────────────────────┘
                       ▲ iSCSI (open-iscsi) attaches the volume to whichever Pod needs it
                       │
                 Application Pod (mounts the Longhorn volume as a PVC)
Step 1: Install open-iscsi on Every Node
Longhorn attaches volumes via iSCSI — without this, the environment check fails before anything else runs:
sudo dnf install -y iscsi-initiator-utils
sudo systemctl enable --now iscsid
sudo systemctl status iscsid
Run this on every node (control plane included, if it’s schedulable).
Step 2: Open Required firewalld Ports
sudo firewall-cmd --permanent --add-port=9500/tcp    # Longhorn engine manager
sudo firewall-cmd --permanent --add-port=9501-9503/tcp  # replica communication
sudo firewall-cmd --permanent --add-port=3260/tcp    # iSCSI target
sudo firewall-cmd --reload
Same explicit-port-table discipline as the Docker and kubeadm guides in this series — no blanket firewalld disable.
Step 3: Prepare a Dedicated Storage Disk
Format and mount a dedicated disk (here, /dev/sdb) on each node so Longhorn doesn’t compete with the OS for I/O or space:
sudo mkfs.ext4 /dev/sdb
sudo mkdir -p /var/lib/longhorn
sudo mount /dev/sdb /var/lib/longhorn
echo "/dev/sdb /var/lib/longhorn ext4 defaults 0 0" | sudo tee -a /etc/fstab
If SELinux is enforcing, confirm the mount inherits a container-accessible context:
sudo semanage fcontext -a -t container_file_t "/var/lib/longhorn(/.*)?"
sudo restorecon -Rv /var/lib/longhorn
Step 4: Install Longhorn via Helm
helm repo add longhorn https://charts.longhorn.io
helm repo update

helm install longhorn longhorn/longhorn \
  --namespace longhorn-system \
  --create-namespace
Wait for all Pods to become Running:
kubectl get pods -n longhorn-system -wAccess the UI (temporarily, via port-forward, before exposing it through the Ingress from the previous guide):
kubectl -n longhorn-system port-forward svc/longhorn-frontend 8080:80Step 5: Set Longhorn as the Default StorageClass
kubectl patch storageclass longhorn \
  -p '{"metadata": {"annotations":{"storageclass.kubernetes.io/is-default-class":"true"}}}'
Confirm:
kubectl get storageclassStep 6: Test with a Stateful Sample App
apiVersion: v1
kind: PersistentVolumeClaim
metadata:
  name: test-pvc
spec:
  accessModes:
    - ReadWriteOnce
  storageClassName: longhorn
  resources:
    requests:
      storage: 2Gi
---
apiVersion: v1
kind: Pod
metadata:
  name: test-pod
spec:
  containers:
    - name: app
      image: busybox
      command: ["sh", "-c", "echo hello-longhorn > /data/test.txt && sleep 3600"]
      volumeMounts:
        - mountPath: /data
          name: vol
  volumes:
    - name: vol
      persistentVolumeClaim:
        claimName: test-pvc
kubectl apply -f test-pvc-pod.yaml
kubectl exec test-pod -- cat /data/test.txtDelete and recreate the Pod (keeping the PVC) to confirm the data survives — that’s the whole point of persistent storage.
Troubleshooting Table
| Symptom | Likely Cause | Fix |
|---|---|---|
| Longhorn environment check fails: “iscsiadm not found” | open-iscsi not installed on that node | Run Step 1 on the affected node, confirm iscsid is active |
PVC stuck in Pending | No default StorageClass set, or insufficient nodes for replica count | Run Step 5; reduce numberOfReplicas in the StorageClass if fewer than 3 nodes exist |
Volume stuck Attaching | iSCSI port 3260 blocked between nodes | Re-check firewalld rules from Step 2 on all nodes, not just the one with the Pod |
Longhorn Manager Pod CrashLoopBackOff | SELinux denial on /var/lib/longhorn mount | Apply the semanage fcontext + restorecon commands from Step 3 |
| UI shows disk as “unschedulable” | Dedicated disk not mounted before Longhorn install, or wrong path | Confirm /var/lib/longhorn is mounted (df -h) before installing; re-add the disk from the Longhorn UI if needed |
| Replica rebuild never completes | Insufficient free space on target node’s disk | Check df -h /var/lib/longhorn on each node; Longhorn needs headroom equal to the volume size per replica |
FAQ
Why does Longhorn’s environment check fail on Rocky Linux?
Most commonly, open-iscsi isn’t installed or iscsid isn’t running. Longhorn depends on the iSCSI initiator to attach volumes, and Rocky Linux doesn’t install it by default — Step 1 covers the fix.
Does Longhorn work with SELinux enforcing on Rocky Linux?
Yes. Keep SELinux enforcing and address specific denials with the correct container_file_t context on the storage mount plus audit2allow for anything else that comes up, rather than disabling SELinux cluster-wide.
How much disk space does Longhorn need per node?
Longhorn replicates each volume across multiple nodes (3 by default), so usable capacity is roughly total raw disk divided by replica count. Use a dedicated disk or partition per node rather than the root filesystem.
Conclusion
With Longhorn deployed, the Rocky Linux 10 cluster from this series now has compute, networking, and persistent storage — enough to run real stateful workloads instead of just stateless demos. From here, the natural next step is layering in scheduled Longhorn backups to an S3-compatible target, or moving on to a monitoring stack (Prometheus + Grafana) to watch the cluster itself.
Related reading: How to Install Docker on Rocky Linux 10 with SELinux · How to Set Up a Kubernetes Cluster on Rocky Linux 10 with kubeadm · NGINX Ingress on Rocky Linux 10 Kubernetes · Longhorn Distributed Storage on Kubernetes (general Ubuntu-based version)
Related posts:
 NGINX Ingress on Rocky Linux 10 Kubernetes (kubeadm)
 How to Set Up a Kubernetes Cluster on Rocky Linux 10 with kubeadm (SELinux & firewalld)
 Top 15 Kubernetes Interview Questions and Answers for Beginners (2025)
 How to Back Up and Restore Kubernetes Cluster Using Velero (2026 Guide)
 How to Install Helm on Ubuntu 26.04 LTS (Complete Guide 2026)
 Kubernetes Network Policies Explained: Secure Pod-to-Pod Communication (2026 Guide)
 How to Deploy a Highly Available Kubernetes Cluster with Keepalived and HAProxy (2026 Guide)
 How to Use Horizontal Pod Autoscaler (HPA) in Kubernetes
