How to Install VMware ESXi: Step-by-Step Bare-Metal Setup Guide
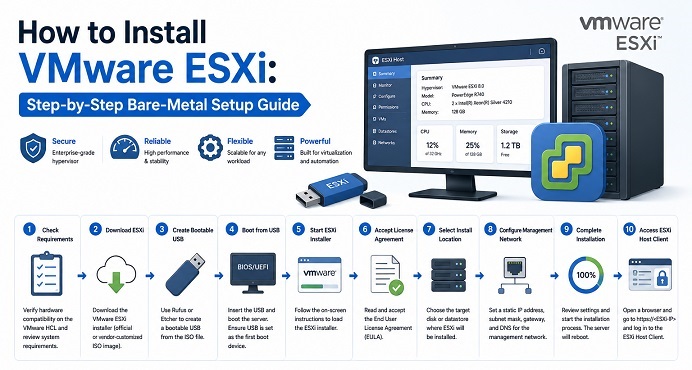
Table of Contents
- ESXi vs. VMware Workstation: Which One Do You Need
- Hardware Compatibility Check
- Downloading the ESXi Installer
- Creating a Bootable USB Installer
- BIOS/UEFI Preparation
- Installing ESXi: Step by Step
- Configuring the Management Network
- Accessing the vSphere Host Client
- Creating Your First Virtual Machine
- Post-Installation Checklist
- Common Issues and Quick Fixes
- Closing Notes
If you’ve read our complete guide to VMware virtualization, you already know ESXi is the bare-metal hypervisor underneath vSphere. This guide is the hands-on counterpart — installing ESXi directly on physical server hardware, from hardware compatibility checks through booting your first virtual machine.
ESXi vs. VMware Workstation: Which One Do You Need
Before starting, it’s worth confirming you actually want ESXi and not VMware Workstation. They solve different problems:
- VMware Workstation is a Type-2 hypervisor — it installs on top of an existing OS (Windows, Linux, macOS via Fusion). Good for running a VM or two on a laptop or desktop you also use for everything else. If that’s your case, our guide on installing VMware Workstation on CentOS Stream 10 is the right starting point instead.
- ESXi is a Type-1, bare-metal hypervisor — it installs directly on the hardware with no host OS underneath it. This is the right choice for a dedicated server running multiple VMs, a home lab, or anything that needs to scale beyond “a VM running alongside my desktop.”
The rest of this guide assumes you’re installing on dedicated hardware that won’t run anything else.
Hardware Compatibility Check
This is the step most worth not skipping. ESXi has a defined Hardware Compatibility List (HCL), and installing on unlisted hardware is the single biggest source of installation failures and post-install driver issues.
- Check your exact server model and component list (NIC, storage controller) against VMware’s compatibility guide.
- Minimum baseline: a 64-bit x86 CPU with hardware virtualization support (Intel VT-x or AMD-V) enabled in firmware, at least two CPU cores, and 4GB of RAM (8GB+ realistic for anything beyond testing).
- Server vendors (Dell, HPE, Lenovo) often publish custom ESXi ISO images bundled with the correct drivers for their hardware — these are worth using instead of the generic VMware ISO if your hardware vendor provides one, since missing storage or NIC drivers are a common post-install headache otherwise.
Downloading the ESXi Installer
- Create or log in to a VMware/Broadcom account through the official downloads portal.
- Locate the ESXi ISO matching the version you intend to run.
- If your hardware vendor offers a customized ISO with bundled drivers, prefer that over the generic image.
A licensing note: VMware’s licensing terms and the availability of any free tier have changed multiple times since Broadcom’s acquisition of VMware. Check the current licensing terms on the official Broadcom site before committing to a deployment plan, rather than relying on older guides (including this one) for pricing specifics.
Creating a Bootable USB Installer
- Get a USB drive with at least 8GB of capacity — it will be fully erased.
- Use a tool like Rufus (Windows) or
dd/Etcher (Linux/macOS) to write the ESXi ISO to the drive. - Select the ESXi ISO as the source image and the USB drive as the target, then write the image.
If you’re installing via IPMI/iDRAC/iLO remote management instead of physical USB, you can mount the ISO directly as a virtual CD-ROM through the server’s remote console — skipping the physical media step entirely.
BIOS/UEFI Preparation
Before booting the installer:
- Enter BIOS/UEFI setup (commonly
F2,Del, orF12depending on the vendor). - Confirm hardware virtualization (Intel VT-x / AMD-V) is enabled — some servers ship with it disabled by default.
- Set the USB drive (or virtual CD-ROM, if using IPMI) as the primary boot device.
- If the target disk currently has RAID configured and you intend to change it, configure RAID before installation — changing it afterward means reinstalling.
Installing ESXi: Step by Step
- Boot from the installer media. The ESXi installer loads and displays detected CPU and memory.
- Press Enter to begin installation.
- Accept the End User License Agreement (F11).
- Wait for device scanning, then select the target disk for installation. This will create a datastore on that disk usable for VM storage.
- Choose your keyboard layout.
- Set the root password — this is the single most important credential on this host; store it in a password manager, not a sticky note.
- Confirm installation with F11.
- Installation typically completes in a few minutes — it’s a lean, minimal install by design.
- Remove the installation media when prompted, then reboot.
Configuring the Management Network
After reboot, you’re at the Direct Console User Interface (DCUI) — ESXi’s text-based local console:
- Press F2 and log in as
root. - Navigate to Configure Management Network.
- Select the network adapter to use for management traffic.
- Switch IPv4 configuration from DHCP to Static, and set the IP address, subnet mask, and default gateway.
- Set primary and alternate DNS servers.
- Press Enter to confirm, then Esc to apply and restart the management network.
This static IP is what you’ll use to reach the host going forward — DHCP is fine for a quick test but impractical the moment you need to consistently reconnect to manage the host or add it to vCenter later.
Accessing the vSphere Host Client
Once the management network is configured, open a browser and navigate to https://<esxi-management-ip>/ui. This launches the vSphere Host Client — a web interface for managing this single host directly, without needing a separate vCenter Server.
Log in with root and the password set during installation.
Creating Your First Virtual Machine
From the Host Client:
- Click Virtual Machines in the left navigation, then Create / Register VM.
- Choose Create a new virtual machine.
- Name the VM and select a guest OS family and version — this affects the default hardware compatibility settings ESXi chooses.
- Select the datastore created during installation.
- Configure CPU, memory, and disk size for the VM.
- Attach an installation ISO (uploaded to the datastore beforehand, or mounted via a remote datastore/content library) as the virtual CD-ROM.
- Power on the VM and proceed with the guest OS installation as you normally would.
Post-Installation Checklist
A few things worth doing immediately after a fresh install, before this host runs anything important:
- Set NTP. Time drift between the hypervisor and guest VMs causes subtle, hard-to-diagnose issues — configure NTP under host settings before anything else.
- Enable lockdown mode if this host will be managed exclusively through vCenter — it restricts direct root login to the host once vCenter is the primary management point.
- Configure a separate VM network distinct from the management network — mixing management and VM traffic on the same vSwitch is a common security and performance oversight.
- Take a baseline snapshot strategy decision early. ESXi snapshots are not backups — plan your actual backup approach for VMs running on this host now, not after something breaks.
Common Issues and Quick Fixes
| Symptom | Likely Cause | Fix |
|---|---|---|
| Installer doesn’t detect the network adapter or storage controller | Hardware is not on the Hardware Compatibility List (HCL) or the required driver is missing from the standard ISO. | Use the server vendor’s customized ESXi ISO that includes the necessary drivers. |
| Server won’t boot from USB | Incorrect boot order configuration or improperly created bootable USB media. | Verify BIOS/UEFI boot order settings and recreate the USB installer using Rufus or Balena Etcher. |
| Can’t reach the Host Client after setup | Management network received a different DHCP address or incorrect network configuration. | Access the DCUI (F2) and verify the static IP address, subnet mask, gateway, and DNS settings. |
| VM won’t power on — “insufficient resources” | Host memory or CPU resources are overcommitted by existing virtual machines. | Reduce VM reservations, shut down unused VMs, or add additional host resources. |
| Hardware virtualization not available to nested VMs | Intel VT-x or AMD-V virtualization extensions are disabled in BIOS/UEFI. | Enable hardware virtualization features in the server BIOS/UEFI settings. |
Conclusion
Installing ESXi itself is the easy part — it’s a deliberately minimal, fast install. The steps that actually determine whether the host runs well in the long run are the ones before and after: confirming hardware compatibility up front, and getting NTP, network segmentation, and a real backup plan in place before the host starts running anything you’d mind losing.
If your use case turns out to be simpler than a dedicated bare-metal host — just a VM or two alongside your existing desktop OS — our guide on installing VMware Workstation on CentOS Stream 10 covers that lighter-weight path instead.
Related posts:
 What is VMware? Complete Guide to Virtualization, vSphere, ESXi, and Cloud Solutions
 How To Install KVM On CentOS Stream 10
 How to Install Proxmox VE on CentOS Stream 10: A Complete Step-by-Step Guide
Proxmox Backup Server: Automated VM Backups Made Easy
How to Install Proxmox VE on CentOS Stream 10: A Complete Step-by-Step Guide
Proxmox Backup Server: Automated VM Backups Made Easy