How to Migrate VMware ESXi VMs to Proxmox VE: Import Wizard, OVF Import & qm disk import

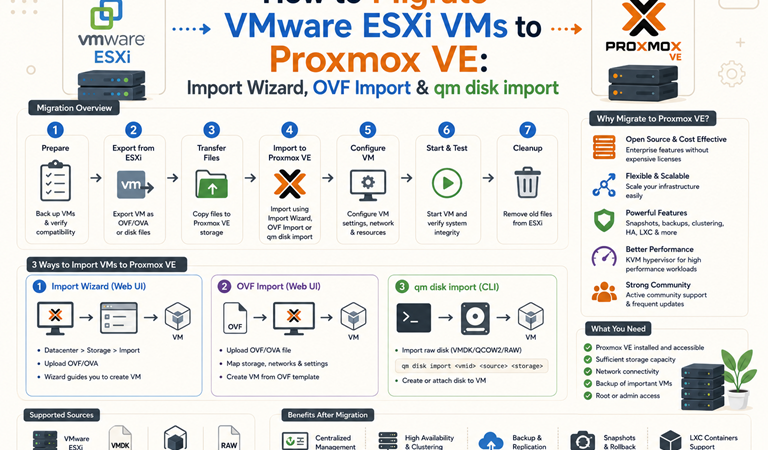
Broadcom’s licensing changes pushed many teams and homelabs to look for an alternative to VMware ESXi. Proxmox VE, an open-source platform built on KVM and LXC with clustering, high availability, and backup built in, is the most common landing spot. The good news: you do not have to rebuild every VM from scratch.
Proxmox includes a built-in ESXi import wizard (introduced in Proxmox VE 8.2), plus two classic routes: importing an exported OVF/OVA, and manually importing a VMDK disk. This guide covers all three, the preparation that prevents most failures, and the post-migration steps that make Linux and Windows guests behave properly on KVM.
Table of Contents
- Choose a migration method
- Pre-migration checklist
- Prepare the Proxmox side
- Method 1: ESXi import wizard
- Method 2: OVF/OVA import
- Method 3: manual VMDK import
- Post-migration: Linux guests
- Post-migration: Windows guests
- Validate, cut over and roll back
- Performance settings worth changing
- Troubleshooting
- FAQ
1. Choose a migration method
| Method | When to use | Pros | Cons |
|---|---|---|---|
| 1. Import wizard | ESXi host is online and reachable from Proxmox | Fastest; reads VM config and disks straight from ESXi; no manual file copying | Not for vSAN-backed or encrypted VMs; needs network access to the ESXi API |
| 2. OVF/OVA import | Host decommissioned, VMs exported, or API access blocked | Carries CPU, memory and disk layout in the descriptor | Needs export time and temporary disk space |
| 3. Manual VMDK import | Wizard and OVF fail, or you want full control | Works with just the disk file | You recreate the VM hardware by hand |
  VMware ESXi host                                   Proxmox VE host
 +----------------------+     Method 1: wizard      +--------------------------+
 | VM: web01            |  ======================>  | ESXi storage (virtual)   |
 |  web01.vmx / .vmdk   |     (API, TCP 443)        |   -> Import -> VM 201    |
 |                      |                           |                          |
 |                      |     Method 2: OVF/OVA     |  qm importovf 201 ...    |
 |                      |  ---- export + copy ---->  |                          |
 |                      |     Method 3: VMDK        |  qm disk import 201 ...  |
 |                      |  ---- scp + convert ---->  |  qm set 201 --scsi0 ...  |
 +----------------------+                           +--------------------------+
2. Pre-migration checklist
Do this on the ESXi side before you touch Proxmox.
| Check | Why |
|---|---|
| Record each VM’s CPU, RAM, disks, NICs, MAC addresses, IP addresses, VLANs | You will need them to recreate and verify the VM |
| Note firmware: BIOS or UEFI, Secure Boot, vTPM | The Proxmox VM must match (SeaBIOS vs OVMF) or it will not boot |
| Check the guest OS and kernel | Modern RHEL-family kernels include VirtIO drivers; older systems may not |
| Consolidate or delete snapshots | The wizard imports the current state, and delta disks complicate manual imports |
| Back up the VM | Always have a restore path before touching production |
| Check licensing and API access | The free ESXi license restricts some APIs; test the wizard early, and fall back to OVF/VMDK |
| Plan downtime | Shut the source VM down for a consistent disk copy |
| Check applications bound to hardware IDs | License servers or software tied to MAC or UUID may need re-activation |
| Free up disk space on Proxmox | You need room for the disks, and for temporary copies in methods 2 and 3 |
Optional but helpful: before migrating, install the QEMU guest agent inside Linux guests (see section 7) so it is ready on first boot, or at least keep a console path.
3. Prepare the Proxmox side
- Storage: choose where disks will land (
local-lvm, ZFS, Ceph, or directory storage). Know which formats it supports: LVM-thin and ZFS use raw volumes; directory storage supports qcow2. - Network bridge: make sure
vmbr0(or your bridge) exists, and VLAN tags match what the VMs used on ESXi. - VirtIO ISO for Windows: upload the VirtIO driver ISO to an ISO-enabled storage (Datacenter > Storage > your storage > ISO Images).
- Staging directory (methods 2 and 3): create a directory with enough free space, for example:
mkdir -p /var/lib/vz/import
df -h /var/lib/vz- Reachability: from the Proxmox host, test the ESXi API port:
nc -zv esxi01.example.com 4434. Method 1: ESXi import wizard
The wizard presents your ESXi host as a special storage from which you can import VMs.
- In the Proxmox web UI: Datacenter > Storage > Add > ESXi.
- Fill in:
- ID: a short name, such as
esxi01 - Server: hostname or IP of the ESXi host (or vCenter)
- Username / Password: an ESXi account, usually
root - Skip Certificate Verification: tick this for the default self-signed certificate on standalone hosts
- ID: a short name, such as
- Click Add. A new storage named
esxi01appears in the left tree. - Click it, and the VM list from ESXi appears. Power the source VM off first.
- Select the VM and click Import. The dialog pre-fills hardware from the source. Review and adjust:
| Setting | Recommendation |
|---|---|
| VM ID | A free ID |
| Storage (target for disks) | Your chosen Proxmox storage |
| Format | Raw for LVM-thin/ZFS; qcow2 on directory storage if you want snapshots there |
| Bridge / VLAN | Match the original network |
| Disk bus (Windows) | Start with SATA or keep the detected controller until VirtIO drivers are installed (section 8) |
| Disk bus (Linux) | VirtIO SCSI is usually fine on current distributions |
| BIOS | Same as the source: OVMF for UEFI, SeaBIOS for legacy |
| OS type | Linux or Windows version, so Proxmox picks sensible defaults |
- Click Import and watch the task log. When it finishes, the VM exists in the Proxmox inventory.
Live import: the wizard also offers an option to start the VM while the disks are still being copied. It shortens downtime but reads blocks over the network on demand, so it is slower for I/O-heavy guests. Use it only after you have tested a normal import and understand the risk of interruption.
Wizard limits: vSAN-backed or encrypted VMs cannot be imported this way, snapshots are not carried over, and ESXi permissions or licensing restrictions may block the API calls. If it fails, move on to method 2 or 3.
5. Method 2: OVF/OVA import
Export from ESXi. In the ESXi Host Client, select the powered-off VM and choose Actions > Export (or export to OVF from vCenter, or use VMware’s ovftool). You receive an .ovf descriptor and one or more .vmdk files, which must stay in the same directory. Copy them to Proxmox:
scp -r ./exported-vm root@pve01:/var/lib/vz/import/Import on Proxmox. qm importovf reads the descriptor, creates the VM, and converts each disk to the target storage:
VMID=201
STORAGE=local-lvm

qm importovf ${VMID} /var/lib/vz/import/exported-vm/web01.ovf ${STORAGE}
qm config ${VMID}
If the VM does not boot afterwards, set the boot disk and controller:
qm set ${VMID} --scsihw virtio-scsi-single
qm set ${VMID} --boot order=scsi0
For an .ova file (a tar archive), extract it first:
tar -xvf web01.ova -C /var/lib/vz/import/web01/Some OVF files written by older tools reference disk paths Proxmox cannot resolve. In that case use method 3 with the VMDK file.
6. Method 3: manual VMDK import
Use this when you only have the disk.
1. Copy the disk. A VMware virtual disk consists of a small descriptor (web01.vmdk) and a data file (web01-flat.vmdk). Copy both into the same directory, for example with scp or rsync from the ESXi datastore (/vmfs/volumes/<datastore>/<vm>/). Enable SSH on ESXi temporarily if needed.
rsync -av --progress root@esxi01:/vmfs/volumes/datastore1/web01/ /var/lib/vz/import/web01/2. Create an empty VM that mirrors the source hardware (adjust to your VM):
VMID=202
STORAGE=local-lvm

qm create ${VMID} \
  --name web01 \
  --memory 4096 --cores 2 --cpu host \
  --ostype l26 \
  --scsihw virtio-scsi-single \
  --net0 virtio,bridge=vmbr0,firewall=0 \
  --bios ovmf \
  --efidisk0 ${STORAGE}:1,efitype=4m,pre-enrolled-keys=0
Use --bios seabios (and omit the EFI disk) for legacy-BIOS guests.
3. Import the disk. qm disk import reads the VMDK and converts it to the storage’s native format:
qm disk import ${VMID} /var/lib/vz/import/web01/web01.vmdk ${STORAGE}If the import complains about the VMDK, convert it first, then import the result:
qemu-img convert -p -f vmdk -O qcow2 /var/lib/vz/import/web01/web01.vmdk /var/lib/vz/import/web01/web01.qcow2
qm disk import ${VMID} /var/lib/vz/import/web01/web01.qcow2 ${STORAGE}(qm importdisk is the older name for the same command and still works.)
4. Attach the disk and set boot order. The imported volume appears as an “unused disk”:
qm set ${VMID} --scsi0 ${STORAGE}:vm-${VMID}-disk-1       # check exact name with: qm config ${VMID}
qm set ${VMID} --boot order=scsi0
Check qm config ${VMID} to confirm the volume name; with an EFI disk present the data disk may be disk-1.
7. Post-migration: Linux guests
Boot the VM from the Proxmox console and fix what changed.
1. Network interface names. VMware’s virtual NIC (ens192) differs from KVM’s VirtIO NIC (ens18), so your connection profile may no longer match:
ip -br link
nmcli connection show
# Re-bind the profile to the new interface name, or create a new one:
sudo nmcli connection modify "System ens192" connection.interface-name ens18
sudo nmcli connection up "System ens192"
If the guest has static IPs tied to the old MAC address, set the old MAC on the Proxmox NIC (net0: virtio=<old-mac>,bridge=vmbr0) to keep DHCP reservations working.
2. Replace VMware tools with the QEMU guest agent:
sudo dnf remove -y open-vm-tools          # Debian/Ubuntu: sudo apt remove open-vm-tools
sudo dnf install -y qemu-guest-agent       # Debian/Ubuntu: sudo apt install qemu-guest-agent
sudo systemctl enable --now qemu-guest-agent
Then in Proxmox: VM > Options > QEMU Guest Agent > Enabled, and restart the VM. This gives you clean shutdowns, accurate IP display, and consistent backups.
3. VirtIO drivers in the initramfs. Current RHEL-family kernels include them. If an older guest refuses to boot from a VirtIO disk, boot it with a SATA disk first, then rebuild the initramfs:
sudo dracut --force --add-drivers "virtio_blk virtio_scsi virtio_net virtio_pci"4. Check SELinux and services. After first boot, verify that SELinux still reports Enforcing and that services start. If a relabel is needed, see SELinux troubleshooting on Rocky Linux 10.
5. Clean up. Remove stale network profiles, reset the machine ID only if you are cloning (not for a one-to-one move), and update monitoring and documentation.
8. Post-migration: Windows guests
Windows has no VirtIO storage driver by default, so a straight switch to VirtIO can end in INACCESSIBLE_BOOT_DEVICE. Use a two-step approach.
- Import the VM with the disk on SATA (or the controller the wizard detected), and the NIC on E1000 if needed so Windows boots without extra drivers.
- Boot Windows and uninstall VMware Tools from Programs and Features (reboot if requested).
- Attach the VirtIO ISO as a CD drive and install the VirtIO drivers and the QEMU guest agent from it (the
virtio-win-guest-toolsinstaller does both). - Add a small temporary VirtIO SCSI disk to the VM, boot, and confirm Windows detects it with the new driver.
- Shut down, switch the boot disk from SATA to VirtIO SCSI, remove the temporary disk, and boot again.
- Change the NIC to VirtIO and re-apply the IP configuration (the new adapter appears as a new interface).
- Enable the guest agent in Proxmox (VM > Options), activate Windows if needed, and check the time zone and domain trust.
9. Validate, cut over and roll back
Validation checklist:
| Check | Done |
|---|---|
| VM boots without errors; console login works | |
| Network: IP, DNS, gateway, VLAN, firewall rules | |
| Application and database services start and respond | |
| Time sync and NTP | |
| Guest agent shows the IP in Proxmox | |
| Backup job (Proxmox Backup Server or vzdump) completes | |
| Monitoring and logging agents report | |
| Users confirm the service works |
Rollback plan: keep the original VM powered off, not deleted, on ESXi until the new VM has run for an agreed period (for example 7 to 14 days). Never run both copies on the same network at the same time, because duplicate IP and MAC addresses cause outages. After sign-off, take a Proxmox backup and then retire the old VM.
For clusters and automatic restarts after a node failure, continue with Proxmox VE Cluster Setup with High Availability. If you are still comparing platforms, read Best VMware ESXi Alternatives in 2026.
10. Performance settings worth changing
| Setting | Recommendation |
|---|---|
| CPU type | host for best performance on a single host; use a baseline model if you will live-migrate across different CPUs |
| Disk controller | VirtIO SCSI single with IO thread enabled for busy disks |
| Disk cache | Default (none) with a good storage backend; avoid write-back without a battery or UPS |
| Discard / SSD emulation | Enable on thin storage so deleted blocks are returned |
| NIC model | VirtIO (paravirtualized) |
| Memory ballooning | Leave enabled for general workloads; disable for databases that need fixed memory |
| NUMA and hugepages | Only for large VMs, after measuring |
11. Troubleshooting
| Symptom | Likely cause | Fix |
|---|---|---|
| Wizard cannot connect to ESXi | Port 443 blocked, wrong credentials, or certificate error | Test with nc -zv host 443; tick Skip Certificate Verification for self-signed hosts |
| Wizard lists no VMs or import fails immediately | Permissions or license limits on the ESXi API, or an unsupported VM type | Use a root account; try method 2 or 3; vSAN-backed and encrypted VMs are unsupported |
| “No bootable device” after import | BIOS/UEFI mismatch, or wrong boot order | Match SeaBIOS/OVMF to the source; qm set <id> --boot order=scsi0; add the EFI disk for UEFI |
| Linux boots to emergency shell | Missing VirtIO drivers, or fstab using device paths that changed | Boot with a SATA disk, rebuild initramfs with VirtIO drivers, use UUIDs in fstab |
Windows INACCESSIBLE_BOOT_DEVICE | VirtIO storage driver not installed | Revert the disk to SATA, install drivers, then switch (section 8) |
| No network in the guest | New interface name or driver; MAC changed | Check ip -br link; rebind the NetworkManager profile; for Windows install the VirtIO NIC driver |
| Imported disk shows as “unused disk” | Disk not attached | qm set <id> --scsi0 <storage>:<volume> |
qm disk import fails on VMDK | Split extents or unusual VMDK subformat | qemu-img convert -f vmdk -O qcow2 ... then import the qcow2 |
| Import is very slow | Network, single-threaded copy, or live-import mode | Use wired 10 GbE where possible; avoid live import for heavy I/O; copy during off-hours |
| Not enough space | Staging copy plus converted disk | Free space or import directly from a mounted share |
| Disk size is full-size after import | Thin provisioning lost on thick targets | Enable discard and run fstrim; choose thin-capable storage |
| VMware Tools services still start (Windows) | Not fully removed | Uninstall via Programs and Features, then clean leftover services |
| Time drift after migration | Guest still uses VMware time sync | Remove VMware Tools; configure chrony or the Windows time service |
| Application license complains | Hardware ID or MAC changed | Keep the original MAC; contact the vendor for re-activation |
12. FAQ
Which Proxmox VE versions include the ESXi import wizard?
It was introduced in Proxmox VE 8.2 and is available in the 9.x series.
Do snapshots migrate?
No. The wizard imports the current state, so consolidate or delete snapshots on ESXi first.
Can I migrate without shutting the VM down?
The wizard offers a live-import option that starts the VM during the copy, but a clean shutdown and a normal import are safer for consistency, especially for databases.
What is the difference between qm importdisk and qm disk import?
They are the same operation. qm disk import is the current name, and qm importdisk remains as an alias in many versions.
Do I need to convert VMDK files to qcow2?
Usually not. qm disk import reads VMDK directly and converts into the storage’s native format. Convert manually only when the import fails.
Can I migrate from the free ESXi license?
Often yes, but the free license restricts some API access, so test the wizard first. If it fails, export the VM or copy the VMDK files.
How do I migrate many VMs?
Script the OVF or VMDK route with qm importovf or qm disk import, and migrate in waves, starting with low-risk systems. Document each VM’s hardware before you begin.
What about backups after the move?
Set up Proxmox Backup Server or scheduled vzdump jobs right after cut-over. If you also keep long-term archives, see Linear Tape-Open (LTO) Explained.
Related posts:
 What is VMware? Complete Guide to Virtualization, vSphere, ESXi, and Cloud Solutions
 How to Install VMware ESXi: Step-by-Step Bare-Metal Setup Guide
 How to Create and Configure a Virtual Machine in VMware ESXi On Rocky Linux 10 (Step-by-Step)
 How To Install KVM On CentOS Stream 10
 Proxmox VE: The Complete Guide to Open-Source Virtualization for IT Professionals
 Introduction to VirtualBox: A Versatile Virtualization Solution
 Introduction to Vagrant: Simplifying Development Environments
 What Is Microsoft Hyper-V ? The Complete Virtualization Guide
